Bulkhead Connector replacement tips/advice

Swanky

New Member
Joined
Jun 23, 2024
Messages
3
Reaction score
0
Location
Knoxville, TN
bulkhead.jpg

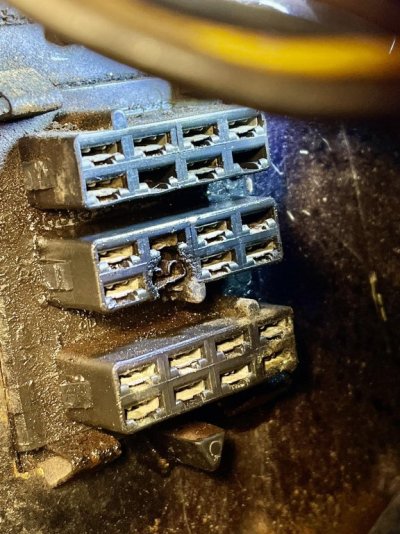
66 300 is bricked due to a typically fried bulkhead connector. I have ordered a replacement.


Before I start this job, I want some info please.

1) I have read people say this must be done inside the car, under the dash, and others say you can pull it into the engine compartment and do it that way. Anyone know for sure what the answer is for my car?

2) Various people said they did this switch in an hour, which gives me great hope. Is that realistic?

3) I don't know what the back side of this looks like. Is there a wire connector for each "slot" and I pull the wires from the old and put them in the new, being careful to put them in the right spots? Should I do anything as I do this like spray with contact cleaner, etc.?

4) The plugs on the engine side are not melted and I intend to put them back. Cleaning them out of course, but I have read folks talk about sanding the connector prongs first. Should I be doing that?

5) I read about dielectric grease, but not sure what to do. I thought it was conductive, but it is not. I know it prevents corrosion, but I assume the entire prong needs to contact the female as well as possible and that grease would impede that. What do I do with dielectric grease here. Everything says apply is lightly, but do I bother?

6) I worry, from other posts, that the plugs may be loose after I pried them off and maybe the plastic side tabs will be loose. Any way to tighten them back up? Replacing those plugs looks like a whole world of work I have no idea how to do.

Thanks!
-Tim
 
1) I have read people say this must be done inside the car, under the dash, and others say you can pull it into the engine compartment and do it that way. Anyone know for sure what the answer is for my car?
I'd do it from under the dash. Take the front seats out and it gets a zillion times easier.
2) Various people said they did this switch in an hour, which gives me great hope. Is that realistic?
Depends on how fast you work, and what issues you run into.
3) I don't know what the back side of this looks like. Is there a wire connector for each "slot" and I pull the wires from the old and put them in the new, being careful to put them in the right spots? Should I do anything as I do this like spray with contact cleaner, etc.?
Yes, they have a female spade connector in each slot. The connector has a little tab that holds it in place that you will have to bend down. I use a small screwdriver or something similar. See the little bent thing on this connector? That needs to be bent down and then bent back up when you reinsert it.
1726522845615.png

4) The plugs on the engine side are not melted and I intend to put them back. Cleaning them out of course, but I have read folks talk about sanding the connector prongs first. Should I be doing that?
I don't like to sand them as it removes the plating. I like to use this stuff to clean them up. Amazon.com
5) I read about dielectric grease, but not sure what to do. I thought it was conductive, but it is not. I know it prevents corrosion, but I assume the entire prong needs to contact the female as well as possible and that grease would impede that. What do I do with dielectric grease here. Everything says apply is lightly, but do I bother?
You are correct that it is non-conductive. I don't use it much or really see a use for it in a limited use car. If you do use it, smear it around the outside of the insulator and not on the connector itself.

It's one of those things that a little is good, so people incorrectly figure that you should use it by the drum load.
6) I worry, from other posts, that the plugs may be loose after I pried them off and maybe the plastic side tabs will be loose. Any way to tighten them back up? Replacing those plugs looks like a whole world of work I have no idea how to do.
Not much more work to replace than what you are already doing. It might even be easier because you aren't under the dash. Again, a little tab holds the connector in place and will need to be bent down.
 
Some of it depends on the free length of your wire harness in the car. However I think you will find that the burnt one (likely to the ammeter) will be stiff and the insulation melted. You will likely have to replace a good chunk of those wires from inside the car. I needed to on mine.
 
couple of things...pushing down on the 2 spring clips up top will allow the connector to tilt into the passenger compartment and lift off the lower clips...at that point you may be able to twist it diagonally and pull it back into the engine compartment...depends on how much slack there is in the harness....each female spade connector in the plug has a little tab on it that locks it into the bulkhead connector...you need to slide a thin flat tool in from the engine side in the slot below the spade...that will release the tab and allow you to pull each wire out the back...once you see its condition you can determine whether you can clean it up, possibly squeeze it tighter if it is loose, or crimp on a new one...the male ends that are in the engine side plugs can be squeezed on the sides with needle nose pliers to release them from the plug, they will be easier to clean up if they are out... the melted ones may do exactly the same thing again...the connectors for the 2 large wires were barely adequate when they were new, and age and corrosion build up resistance and make connections hot...many people will just run a new wire straight through the bulkhead plug and eliminate those 2 connectors completely...others go even further and upgrade wire sizes and/or bypass the ammeter ...lots of threads here on doing that
 
Last edited:
Back
Top