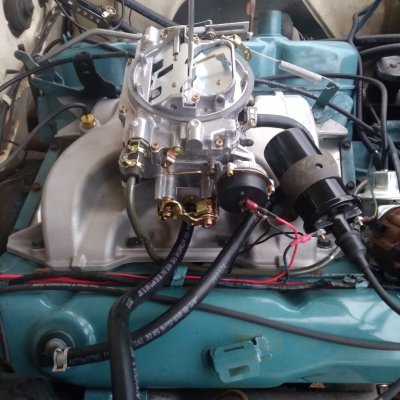
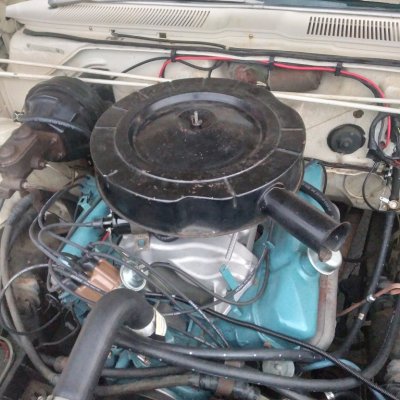
(Another) 383 2 bbl to 4 bbl conversion thread, anyone got a parts list?

View attachment 692101
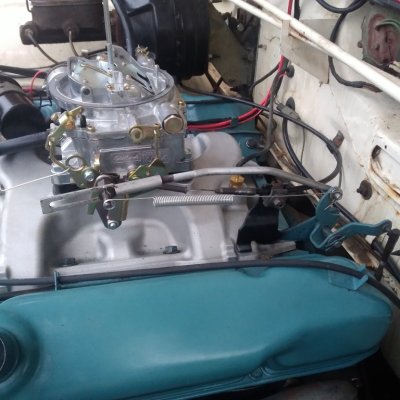
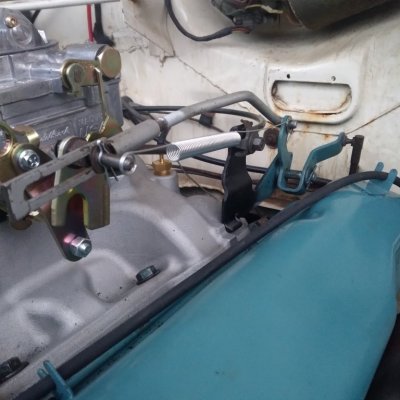
The red spring is attached exactly as per the FSM for the 1968 Chrysler Newport. I doubled the throttle return springs, one inside the other to insure that if one broke, the other would still return the throttle to idle. I HATE having to turn the damned engine off suddenly when a throttle return spring breaks or otherwise comes loose. Not good for the engine at ALL either.
2024207.jpg


I guess both versions accomplish the same thing.
 
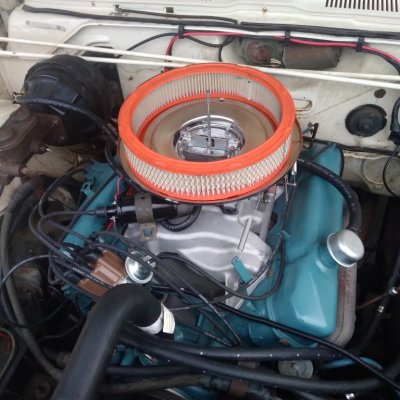
Update: alright, much like the block's heater hose inlets and outlets, I finally got off my lazy *** and decided to get around to doing this...and it actually went quite well, albeit with a few hiccups. It's still a work in progress, but right now, I can confirm that even with the stock air filter (3.5 inch), it juuuust clears the hood and that's with a 1/2 inch phenolic spacer too! You'll need the following parts however:
- phenolic spacer (apparently these carbs suffer from heat soak and these spacers reportedly help a lot with this)
- if the spacer doesn't come with a stud kit, get a 2 inch stud kit
- 350 mm/14 inch air cleaner base plate, recessed is not necessary
- 280 mm/11 inch ID Air filter, either 3.5 inch or 2.75 inch. Fram CA127 or CA305 respectively for cross referencing. Not sure if the lower flow rate of the 2.75 inch will be noticeable.
- Air cleaner cover stud of at least 6 inches when using a 2.75 inch filter, else go 6.75-7 inches with the 3.5 inch filter. The stud that came with the AVS2 was 5.5 inches and just a bit too short.
- fuel hose or steel fuel line to connect the fuel filter to the carby.
Again, this is still a work in progress, so there may be other parts you may or may not need; I haven't gotten around to testing out the throttle cable and kickdown linkages with the brackets yet.

This square bore, 4-hole spacer I found was from a local shop for a VERY reasonable price compared to what Edelbrock and other retailers are asking. Just 20 AUD, fortunately for me, he was in the same city as me so I just went and picked it up, saving the shipping fee. The stud kit it came with was a bit short, overall length is 45mm; you might be able to get away by partially threading the intake side threads, but I didn't feel too sure about that so I'm going to get a 2 inch overall length stud kit from Rocket Industries, it's only $9.60. The 45mm stud kit was just shy under the top surface of the spacer, you'd need at a bare minimum of a 50mm to thread nuts on it...which just so happens to be the 2 inch kit.

As for the air cleaner base, for those who wish to use the stock air filters, I took a gamble, and it paid off: Aeroflow AF2851-1400 - fairly cheap, the stock filter fits perfectly on this base plate. The great thing is it also has a 5/8" hole on the inner side of the filter if you want to hook up a PCV hose to the oil/breather cap. This can also be bought from Rocket Industries. Using the factory pie tin with this, there is now about an inch-wide gap all around the circumference between the base and the cover, but it's really only visible if you look down the air horn, or from underneath. The main concern is ensuring an airtight seal between the cover and the base, which this setup still definitely does.

The air cleaner cover stud that came with the AVS2 was 5.5 inches - fully threaded into the carby, it was too short when used in conjunction with the 3.5 inch filter. With the 2.75 inch filter, only partially threading the stud will give just enough thread to tighten the wingnut down, there's still plenty of engagement in the carby, but if it still irks you, get a 1/4-20 threaded rod and cut it to 170 mm or 6.75 inches. This will enable usage of both 3.5 and 2.75 inch tall filters.

Now I don't know about the genuine Weiand 8008 intakes, but this knockoff...well, you get what you pay for. While I got mine for half the price (a result of helping out the seller with his own cars and some computer/tech support stuff) of a real 8008 from a local retailer, the casting isn't completely perfect - the kickdown pivot point bracket that you can see in Cartel's image...it didn't fit on this intake. The casting is too wide, so I'll have to grind off a decent chunk to get it to fit. The throttle return spring bracket I also had to grind a bit as the casting was too big on that side too. I suspect that the OG 8008 intakes won't suffer from these problems and you probably won't have to go through this.

For us RHD people, there's enough slack in the throttle cable to not require modifying it, but the clamp itself may sit rather short so you might need to stick it in a vise or use pliers and bend it.

Another problem I encountered was the 3/8" vacuum port on the intake that has a little auxiliary 1/8" barb coming out of it, this sucker is absolutely stuck on the old intake, I'm just going to buy one 1/8" barb-3/8" NPT fitting, and one 3/8" barb-1/4" NPT fitting in order to take advantage of the vacuum port on the carby, as well as the port on the intake. The 1/8" barb is for the vacuum-operated vent controls. I'm using separate fittings for these because reproductions are insanely expensive.

I got a 5/16 inch coated steel fuel line, and bent it partially following the original fuel line, up to the carby fuel inlet barb. A pipe bending tool will help a lot for this, but isn't absolutely essential, you can do this by hand if you're not bothered by the messy look. The stock carby inlet is 3/8 inch while the line is 5/16, but as others have mentioned previously, you can use a single flare on the line to allow it to accommodate a 3/8 inch fuel hose as needed.

Before:
20241229_075832.jpg
After:
20250101_080028.jpg

@Captainfury thought I'd include you on this since you were also wanting to do a similar conversion.
 
Last edited:
Dammit, forgot about the 10000 minute time limit to edit posts.

The throttle linkage bracket will need some modification, specifically, where the throttle cable gets clamped to the bracket, will need to be raised by about 10-20mm or until the cable comfortably reaches the throttle lever pin. You may need a metal bender for this, as it's pretty thick steel. Might be doable with two pliers but I didn't bother trying. Alternatively, if you've got some extra cash, you can buy a throttle cable bracket from Mancini Racing or Rick Ehrenberg, Mancini part numbers MREAR036 for the 383 bracket, and MREAR018 for the 440 bracket. The brackets are intended for an Edelbrock Performer RPM manifold, but should also work with other similar dual-plane intakes.
could a guy make sure theres enough intake bolt threads and shim washers under the bracket?
I guess for sure you would see issues if you had spacers like 2" and above.
 
I meant to type this earlier, but got distracted...ahem.

****. MOSQUITOES.

Pardon my French, but that is all. Anyway, you might be able to, but then my concern is that it'd affect the geometry of the kickdown unless the rod is long enough for you to continue using it. Which, judging by Gerald's pics of his setup, seems to be doable, so the concern now moves on to the fact that the bracket has also moved horizontally away from the original position. Which was why I opted to just bend the bit that the throttle cable clamps on to.

The stud for the actual clamp itself is just too short for macgyvering some sort of doohickey to raise the cable, the only way I can see this being done is if you got some sort of female-female thread extender, put one end of it onto the stud, then get some threaded rod on the other end, and then using some small piece of steel together with the clamp itself to hold the cable in place, with a nut or two below the steel piece to raise its height. Personally I think it's more trouble than just bending the bracket even without a metal bender handy. Do be aware that if you do do this with just a pair of adjustable plier wrenches, don't be surprised if you mar the surface...the steel is THICK. I had to basically stand on one pair of pliers holding the clamp down, then force the other pair with both arms. If you're old I think you will struggle, so the preferable option is to either use a vise, or take it to a machine shop that can bend it for you. I marred the crap out of mine because one pair of pliers I used had serrated jaws.
 
Last edited:
The reason I put the throttle rod extension in my list is that when I did the upgrade to the Torker 383 and 9801TQuad, the stock 4bbl throttle rod only had about 2 threads of engagement with the slotted end of the stock 4bbl rods mechanism, so I got it for good insurance, and it worked well. I ended up filing the soft metal of the rear section a bit shorter, for good measure, though. Then I got another rear rod from the salvage yard. I still kept the extension in the mix when I put a Holley 4160 in place of the TQuad.

Good to see that there is enough slack in the 2bbl accel cable, too.

Take care,
CBODY67
Got everything put back together and this is exactly what happened with mine and the weiand 8008 copy - there's about two threads of engagement with the stock kickdown rod, I would say the extension is needed. The rod doesn't sit flat against the lever (the whole lever pin thing sticks out to the side quite a bit, it's not in line with the kickdown linkage anymore), but it still seems to work well enough when testing the accelerator pedal with all the springs in place.

On a side note, I can confirm the 2 bbl cable (at least for RHD cars) has LOTS of slack, in fact it was an issue in that when adjusting the linkage as per the FSM, it ended up such that I had to clamp down on the plastic sheath section, which was just too small in diameter. Thankfully, my cable seemed to have the remnants of one of those steel cable clamps that uses a bolt to hold it down against something, so I just used that under the throttle bracket clamp, and it worked really well to hold the cable in place.
 
Update: alright, much like the block's heater hose inlets and outlets, I finally got off my lazy *** and decided to get around to doing this...and it actually went quite well, albeit with a few hiccups. It's still a work in progress, but right now, I can confirm that even with the stock air filter (3.5 inch), it juuuust clears the hood and that's with a 1/2 inch phenolic spacer too! You'll need the following parts however:
- phenolic spacer (apparently these carbs suffer from heat soak and these spacers reportedly help a lot with this)
- if the spacer doesn't come with a stud kit, get a 2 inch stud kit
- 350 mm/14 inch air cleaner base plate, recessed is not necessary
- 280 mm/11 inch ID Air filter, either 3.5 inch or 2.75 inch. Fram CA127 or CA305 respectively for cross referencing. Not sure if the lower flow rate of the 2.75 inch will be noticeable.
- Air cleaner cover stud of at least 6 inches when using a 2.75 inch filter, else go 6.75-7 inches with the 3.5 inch filter. The stud that came with the AVS2 was 5.5 inches and just a bit too short.
- fuel hose or steel fuel line to connect the fuel filter to the carby.
Again, this is still a work in progress, so there may be other parts you may or may not need; I haven't gotten around to testing out the throttle cable and kickdown linkages with the brackets yet.

This square bore, 4-hole spacer I found was from a local shop for a VERY reasonable price compared to what Edelbrock and other retailers are asking. Just 20 AUD, fortunately for me, he was in the same city as me so I just went and picked it up, saving the shipping fee. The stud kit it came with was a bit short, overall length is 45mm; you might be able to get away by partially threading the intake side threads, but I didn't feel too sure about that so I'm going to get a 2 inch overall length stud kit from Rocket Industries, it's only $9.60. The 45mm stud kit was just shy under the top surface of the spacer, you'd need at a bare minimum of a 50mm to thread nuts on it...which just so happens to be the 2 inch kit.

As for the air cleaner base, for those who wish to use the stock air filters, I took a gamble, and it paid off: Aeroflow AF2851-1400 - fairly cheap, the stock filter fits perfectly on this base plate. The great thing is it also has a 5/8" hole on the inner side of the filter if you want to hook up a PCV hose to the oil/breather cap. This can also be bought from Rocket Industries. Using the factory pie tin with this, there is now about an inch-wide gap all around the circumference between the base and the cover, but it's really only visible if you look down the air horn, or from underneath. The main concern is ensuring an airtight seal between the cover and the base, which this setup still definitely does.

The air cleaner cover stud that came with the AVS2 was 5.5 inches - fully threaded into the carby, it was too short when used in conjunction with the 3.5 inch filter. With the 2.75 inch filter, only partially threading the stud will give just enough thread to tighten the wingnut down, there's still plenty of engagement in the carby, but if it still irks you, get a 1/4-20 threaded rod and cut it to 170 mm or 6.75 inches. This will enable usage of both 3.5 and 2.75 inch tall filters.

Now I don't know about the genuine Weiand 8008 intakes, but this knockoff...well, you get what you pay for. While I got mine for half the price (a result of helping out the seller with his own cars and some computer/tech support stuff) of a real 8008 from a local retailer, the casting isn't completely perfect - the kickdown pivot point bracket that you can see in Cartel's image...it didn't fit on this intake. The casting is too wide, so I'll have to grind off a decent chunk to get it to fit. The throttle return spring bracket I also had to grind a bit as the casting was too big on that side too. I suspect that the OG 8008 intakes won't suffer from these problems and you probably won't have to go through this.

For us RHD people, there's enough slack in the throttle cable to not require modifying it, but the clamp itself may sit rather short so you might need to stick it in a vise or use pliers and bend it.

Another problem I encountered was the 3/8" vacuum port on the intake that has a little auxiliary 1/8" barb coming out of it, this sucker is absolutely stuck on the old intake, I'm just going to buy one 1/8" barb-3/8" NPT fitting, and one 3/8" barb-1/4" NPT fitting in order to take advantage of the vacuum port on the carby, as well as the port on the intake. The 1/8" barb is for the vacuum-operated vent controls. I'm using separate fittings for these because reproductions are insanely expensive.

I got a 5/16 inch coated steel fuel line, and bent it partially following the original fuel line, up to the carby fuel inlet barb. A pipe bending tool will help a lot for this, but isn't absolutely essential, you can do this by hand if you're not bothered by the messy look. The stock carby inlet is 3/8 inch while the line is 5/16, but as others have mentioned previously, you can use a single flare on the line to allow it to accommodate a 3/8 inch fuel hose as needed.

Before:
View attachment 699817
After:
View attachment 699818

@Captainfury thought I'd include you on this since you were also wanting to do a similar conversion.
Thanks for the thought edbods. Not too many c bodies down under. We need all the help we can get!
I was keen for the 4 bbl/ Al / open up exhaust flow thing, but I’ve decided against it now.
I’ve always thought everyone ought to do what makes them happy when it comes to car upgrades and changes,
Update: alright, much like the block's heater hose inlets and outlets, I finally got off my lazy *** and decided to get around to doing this...and it actually went quite well, albeit with a few hiccups. It's still a work in progress, but right now, I can confirm that even with the stock air filter (3.5 inch), it juuuust clears the hood and that's with a 1/2 inch phenolic spacer too! You'll need the following parts however:
- phenolic spacer (apparently these carbs suffer from heat soak and these spacers reportedly help a lot with this)
- if the spacer doesn't come with a stud kit, get a 2 inch stud kit
- 350 mm/14 inch air cleaner base plate, recessed is not necessary
- 280 mm/11 inch ID Air filter, either 3.5 inch or 2.75 inch. Fram CA127 or CA305 respectively for cross referencing. Not sure if the lower flow rate of the 2.75 inch will be noticeable.
- Air cleaner cover stud of at least 6 inches when using a 2.75 inch filter, else go 6.75-7 inches with the 3.5 inch filter. The stud that came with the AVS2 was 5.5 inches and just a bit too short.
- fuel hose or steel fuel line to connect the fuel filter to the carby.
Again, this is still a work in progress, so there may be other parts you may or may not need; I haven't gotten around to testing out the throttle cable and kickdown linkages with the brackets yet.

This square bore, 4-hole spacer I found was from a local shop for a VERY reasonable price compared to what Edelbrock and other retailers are asking. Just 20 AUD, fortunately for me, he was in the same city as me so I just went and picked it up, saving the shipping fee. The stud kit it came with was a bit short, overall length is 45mm; you might be able to get away by partially threading the intake side threads, but I didn't feel too sure about that so I'm going to get a 2 inch overall length stud kit from Rocket Industries, it's only $9.60. The 45mm stud kit was just shy under the top surface of the spacer, you'd need at a bare minimum of a 50mm to thread nuts on it...which just so happens to be the 2 inch kit.

As for the air cleaner base, for those who wish to use the stock air filters, I took a gamble, and it paid off: Aeroflow AF2851-1400 - fairly cheap, the stock filter fits perfectly on this base plate. The great thing is it also has a 5/8" hole on the inner side of the filter if you want to hook up a PCV hose to the oil/breather cap. This can also be bought from Rocket Industries. Using the factory pie tin with this, there is now about an inch-wide gap all around the circumference between the base and the cover, but it's really only visible if you look down the air horn, or from underneath. The main concern is ensuring an airtight seal between the cover and the base, which this setup still definitely does.

The air cleaner cover stud that came with the AVS2 was 5.5 inches - fully threaded into the carby, it was too short when used in conjunction with the 3.5 inch filter. With the 2.75 inch filter, only partially threading the stud will give just enough thread to tighten the wingnut down, there's still plenty of engagement in the carby, but if it still irks you, get a 1/4-20 threaded rod and cut it to 170 mm or 6.75 inches. This will enable usage of both 3.5 and 2.75 inch tall filters.

Now I don't know about the genuine Weiand 8008 intakes, but this knockoff...well, you get what you pay for. While I got mine for half the price (a result of helping out the seller with his own cars and some computer/tech support stuff) of a real 8008 from a local retailer, the casting isn't completely perfect - the kickdown pivot point bracket that you can see in Cartel's image...it didn't fit on this intake. The casting is too wide, so I'll have to grind off a decent chunk to get it to fit. The throttle return spring bracket I also had to grind a bit as the casting was too big on that side too. I suspect that the OG 8008 intakes won't suffer from these problems and you probably won't have to go through this.

For us RHD people, there's enough slack in the throttle cable to not require modifying it, but the clamp itself may sit rather short so you might need to stick it in a vise or use pliers and bend it.

Another problem I encountered was the 3/8" vacuum port on the intake that has a little auxiliary 1/8" barb coming out of it, this sucker is absolutely stuck on the old intake, I'm just going to buy one 1/8" barb-3/8" NPT fitting, and one 3/8" barb-1/4" NPT fitting in order to take advantage of the vacuum port on the carby, as well as the port on the intake. The 1/8" barb is for the vacuum-operated vent controls. I'm using separate fittings for these because reproductions are insanely expensive.

I got a 5/16 inch coated steel fuel line, and bent it partially following the original fuel line, up to the carby fuel inlet barb. A pipe bending tool will help a lot for this, but isn't absolutely essential, you can do this by hand if you're not bothered by the messy look. The stock carby inlet is 3/8 inch while the line is 5/16, but as others have mentioned previously, you can use a single flare on the line to allow it to accommodate a 3/8 inch fuel hose as needed.

Before:
View attachment 699817
After:
View attachment 699818

@Captainfury thought I'd include you on this since you were also wanting to do a similar conversion.
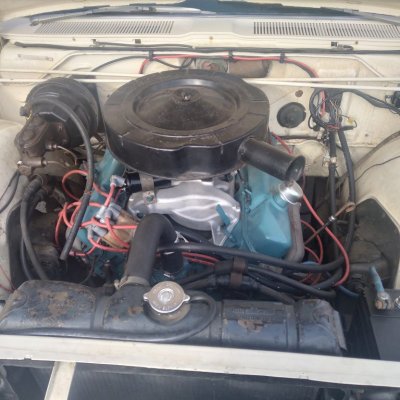
Thanks edbods for including me- very thoughtful. Us Aussies need all the help we can get when c bodies are concerned.Rare beasts down under.
I was keen on the 4BBL/improve intake and exhaust flow for performance thing, but I’m leaving her per factory, except new wheels.
Here’s some pics of a couple of things- I found the broadcast sheet, fixed speedo clip and cable, and I pulled off the rear bumper and mounts and cleaned it all up and repainted and rewired. The valance was very rusty as you can see, just undercoat here.
Cheers
IMG_2190.jpeg
IMG_2362.jpeg
IMG_2256.jpeg
IMG_2166.jpeg
 
Fair enough, at the end of the day you do what makes you happy. Gonna keep mine largely stock but go to 15 inch mopar police wheels. Stock 383 with stock log manifolds, but now with the AVS2, am looking into getting a dual exhaust since that'd become a major choke point.
It also now has electronic ignition courtesy of an FBO box and a new electronic distributor from Rick Ehrenberg. Now I just gotta tune both the carb and the dizzy.
One day I'll take it to Eastern Creek, maybe you might see photos of it flying around a corner haha
Seeing your photos makes me wish I had room to do major things like gearbox or body work
 
could a guy make sure theres enough intake bolt threads and shim washers under the bracket?
Actually, thinking about this some more...you might be able to get away with it. I was worried that the vertical rod with the little ball socket might be too off axis, but as long as it doesn't rub against anything too hard, it should be right. I just don't know how much length it has or whether you need an extension.
In other news, the 1/8" and 3/8" barbs arrived, so now the brake booster and air vent controls will work! It's all coming together. Final step is installing the new fuel filter, dunno if I should replace the fuel pump while I'm at it though...seems to be ok and if it's an OEM unit I don't really want to replace it unless it's absolutely shot as OE units are about as good as it gets. Got a replacement Carter pump, but also don't know just how good (or bad) new ones are. The fact that it's made in Mexico rather than the US implies that cost cutting may play a role...whether that affects build quality remains to be seen.
 
Last edited:
Fair enough, at the end of the day you do what makes you happy. Gonna keep mine largely stock but go to 15 inch mopar police wheels. Stock 383 with stock log manifolds, but now with the AVS2, am looking into getting a dual exhaust since that'd become a major choke point.
It also now has electronic ignition courtesy of an FBO box and a new electronic distributor from Rick Ehrenberg. Now I just gotta tune both the carb and the dizzy.
One day I'll take it to Eastern Creek, maybe you might see photos of it flying around a corner haha
Seeing your photos makes me wish I had room to do major things like gearbox or body work
Hi edbods
Like yours, I’m staying stock too- a LOT better if the day ever comes to sell. Or if there’s kids that are interested they’ll be mighty glad it’s stock so they can appreciate it also. I would love to put on the 2.5 inch exhaust, and other bits, but it gets back to the earlier statement.so just the wheels for looks.Mine came with electronic ignition so that’s nice.
I put R Ehrenbergs ignition module on mine to replace the 50 year old module- mainly because the original one was very shabby looking, and I do like a clean looking engine bay. Some don’t worry about that which is ok.
In regards to room, I guess I have some space for gearbox or panel work, but I only ever get around to the easy stuff now. My son was a great help until he got into a serious relationship with a girl, so it’s now “ bye bye dad..”, unfortunately for me.
That’s ok however, I was exactly the same at 24.
I went to Eastern Creek years ago when a drag racing event was in. I will never forget it. Just incredible. DoThey say that the experience can’t be put into words or compared to video or tv. That’s so true. I was just stunned by the immense vibration of the ground and air and everything else. Plus it was a stinking hot day, plus loads of beers in the belly, plus 6 mates, plus youthful energy, made it one of those days that stays with one forever.
Cheers
 
Back
Top