New Member, 1967 Imperial

No. This is a bi-polar owner:

pink_bugatti_veyron.jpg

To show your wealth or be an attention *****.
Wealthy attention whores are the worst.

pink_bugatti_veyron.jpg
 
Last edited:
Wow you have t-bar adjusters cranked all the way up that can't be good. That statement alone should make Ross sweat. LOL
 
Update!

A fellow Imperialist contacted me off-list and offered to send his isolators to Then and Now Automotive in Massachusetts. They will then rebuild them, and send them to me. When I get them, I'll swap them out for mine, and send mine to the original guy. This means the car won't be immobile for several weeks while the isolators are being rebuilt.

(And by the way, I talked to the owner of Then and Now, and he seems like a really good guy. They specialize in stuff older than our cars, making parts for teens, '20s and '30s cars that aren't built elsewhere. It's going to be expensive, like $125 each, but this is the cost of doing one-off, specialized parts. I'm pretty pleased with the situation.)

I'm still going to stop driving the car, though. I'll swap the baby seat back to the truck and drive that daily instead.

Things are looking up again for the bipolar owner!
 
Wow you have t-bar adjusters cranked all the way up that can't be good. That statement alone should make Ross sweat. LOL

Yeah, I tend to go on and on, so I cut that part short. My driver's side is adjusted to the proper ride height, but the passenger's side is cranked up as far as it will go, and it's still lower than specification. Talking with another Imperial owner on Tuesday, he suggested that pulling to the left, left side isolator being bad, and the right side out of adjustment could all be related. The slop in the torsion bars may be letting the car not sit right, and it's being (mostly) adjusted to sit right, but it's masking the bigger problem.

I'm not sure this is correct, but it sounds plausible. And in any case, it's not going to do a lot of good to align the car if I can't get the ride height set right, and if the spring mounts aren't solid. So it becomes a circular kind of thing, and the one thing that links them all together is getting the isolators fixed right.

I'll still need to rebuild the front end eventually, but this should allow me to make a step in the right direction.
 
Fellow Imperialist that's funny. I am going to have to get one then I can be a Imperialist attention ***** lol.
 
In the overall context of things, I'd say for only $250, you're getting off fairly easily. Make sure you send your fellow Imperialist a case of beer. That's really nice of him.

Posted via Topify on Android
 
Totally. It's super-cool. It's not unheard of though. I own a pretty rare motorcycle, and there's an informal exchange program for the front shock (it's a front-swingarm design). Basically, someone with a spare shock will send it to the rebuilder, and get the worn one back from the other member. I have three sets of Budd calipers, so I offered the same service on the Imperial group.

It's not less cool for it, but it's nice to see the community spirit in action in multiple places.
 
Got a note today that the isolators are off to the rebuilders. A couple days out, two weeks turnaround and another week or two to find the weekend to put them back on. Middle of March?
 
Less than 20 minutes!

I just got a call from the guys at Then & Now. They have my isolators ready to ship out to me. It's a little surprising, since I was under the impression that they were rebuilding the set they were sent. But I have also heard that it's possible that they have sets in stock, and just insist on cores before shipping.

So I'll try to get them on before the end of the month.
 
Obviously end of the month didn't happen. But it is happening this weekend. I've reserved space in my brother's carport/yard, and spent some time helping him clean/organize his workshop, so there's room for my car (and goodwill to keep it there). I'm planning on getting the car over there Friday night so I can get up good and early (for a Saturday) and get it up on jack stands and get the Isolators changed over. It should be a quick job, but I have the weekend planned to allow for things that go wrong.

My tasks for the weekend, in order of priority:

1. Remove/replace Isolators
2. Inspect passenger side torsion bar adjuster
3. Replace broken front sway bar link (and the good one on the other side for good measure)
4. Replace rear brake hose
5. Replace master cylinder
6. Flush brake fluid (not just bleed)
7. Drain/replace trans fluid and gasket
8. Replace flex fan with factory fan and new clutch
9. Replace motor mounts

I don't think I can get through all of those this weekend, but I wanted to make sure I had parts and a plan in case things went smoothly, and I could make best use of my time. I'm unlikely to get to carve off an entire weekend any time in the near future.
 
Okay, so I got through 1 and 2 today, and got stymied on 3.

As I've mentioned in other posts, I don't have a place to work on my car where it can be dismantled for multiple days and unmovable. I arranged to help my brother clean out his carport so I could work on it at his place. He's only about a mile from me, but he's far enough from the beach that he has a little extra space.

So, we pulled it in, and got it up on jack stands at four corners, plus an extra set as backup under the K-member. I don't want this thing falling on my head when I'm under there.
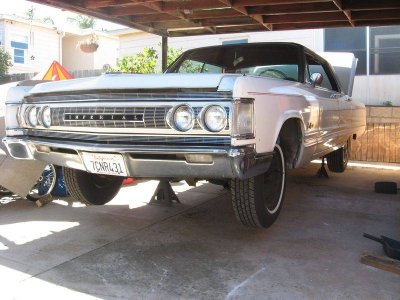
IMG_3917-sm.jpg

(Don't ask why I took off the hubcaps, but didn't remove the wheels.)

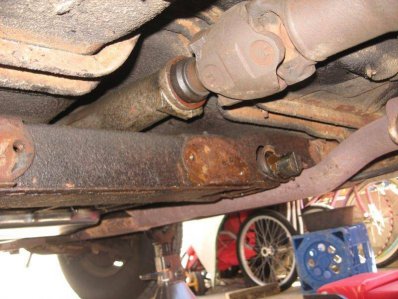
Getting under the car was easy, but it's pretty greasy down there, and a little rusty. Nothing too bad, no real rot, but you can tell it's not a California car. With the car up, and the wheels at full droop, it was then time to untighten both adjusters. The passenger side was totally stuck. I used penetrating fluid and a BFBB (big f--- breaker bar) to back it out.

After that, I opened up the lock rings over the dust boots, and moved the dust boots forward off the bar ends. The grease inside was still kinda greasy, and not totally dried out.
IMG_3919-sm.jpg

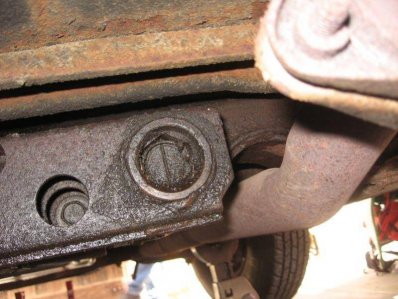
Next step was With a 3/4" socket on a short extension, the subframe came unbolted pretty easy. You can see the mounting bolt (one of four) in the picture above. I had to persuade the subframe to come off the torsion bars with a hammer (and a block of wood to avoid hitting the frame directly). The reason for this became clear later.

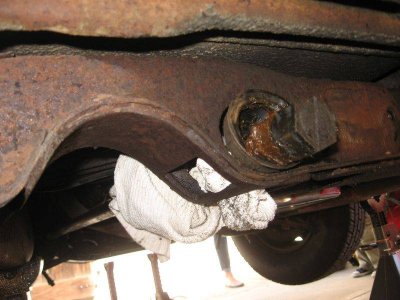
Once the subframe was off, the torsion bars hung loose in the pass-through holes. Everywhere I read said to be really careful not to damage the bar exteriors, so I wrapped some rags around the bars to prevent metal to metal contact when I was moving things around. Probably unnecessary, but it was easy to do, you know?
IMG_3926-sm.jpg

IMG_3917-sm.jpg


IMG_3919-sm.jpg


IMG_3926-sm.jpg
 
Last edited:
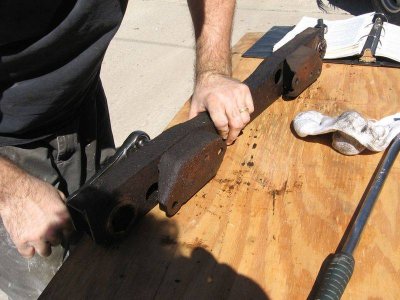
In case you're wondering what the subframe looks like that the isolator subframe mounts to:

IMG_3928-sm.jpg

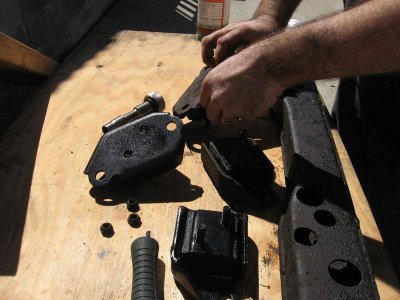
With the subframe out, I removed the isolators. A pretty straight forward job.

IMG_3931-sm.jpg

And replace with the new ones....

IMG_3932-sm.jpg

And torque to 30 lb-ft. Or ft-lb. Whatever.

These pieces, rebuilt by Then and Now Automotive, weren't cheap. $250 plus shipping each way. But they are the only game in town, and they look to be very nicely made. Plus, the turnaround was fast (apparently that's because it was cold when I ordered them. In the summer, they wait until there's a larger order using their vulcanizer, because it's hot work, and they want to do it all at once). I talked to the owner on the phone when setting this up, and he sounds like a really straight shooter. Very pleasant to do business with.

I used Simple Green and a scrub brush, and removed the grease. I also scraped away the bigger flakes of rust. But I didn't otherwise paint it. And I now owe my sister-in-law a new scrub brush. I am hoping to get it in her kitchen cleaning bucket before she realizes it's gone....

IMG_3928-sm.jpg


IMG_3931-sm.jpg


IMG_3932-sm.jpg
 
When putting the isolator frame back on, I noticed that the reason it needed to be hammered off was that the bars had some residual tension on them, and without the frame in place, they rotated just a couple degrees, and made it impossible to slip the bars back in their mounts. I futzed with it quite a bit, but without using a pipe wrench on the bar itself (a big no-no), I didn't know how to get any torque on the spring to rotate it back in place.

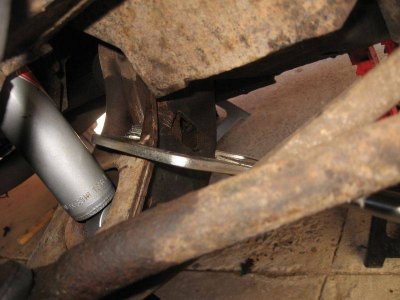
After posting here in the "Suspension" section, I went back and looked some more. I noticed that where the bar went into the lower control arm, it acted on a finger that extended outboard, towards the wheel. This finger is what the adjuster screw acts on. I found I could push it down, which moved the bar in the right direction. But I couldn't get enough pressure on it with my fingers, and I couldn't get enough purchase with my Channel-locs. I tried putting a little block of wood over the finger to get better leverage, but just managed to drop it into the cavity in the control arm. Finally I asked my brother if he had any clamps. Turns out he had "borrowed" one of my big Vise Grip clamps I use for welding set-up. I wondered why I only had two around the shop. Lucky for me, though. Because it fit right over the arm and finger, and had enough travel and leverage to give me the torsion bar rotation I needed.

IMG_3936-sm.jpg

Frame went on with minimal persuasion, and we torqued it down to 75 ft-lb. Lb-ft. Whatever.

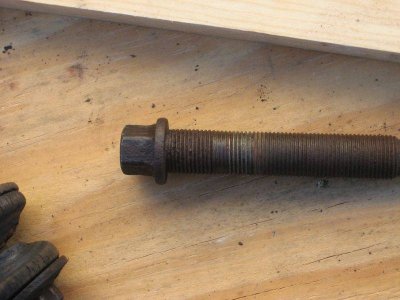
Before putting the adjusters back in, I took a moment to examine my passenger side bolt. No wonder it wouldn't thread in any more. It was really munged up in the threads.

IMG_3937-sm.jpg

I'm hoping this was the reason it wouldn't adjust properly, and there isn't a whole raft of other front end issues I still need to sort out. I'm not totally confident, however, because I noticed the left and right sides didn't sit in the adjusters and against the fingers the same. There was a lot more play on the passenger side.

Still, I'll wait and see how it looks when it's down on all four wheels, and I go through the factory adjustment procedure.

IMG_3936-sm.jpg


IMG_3937-sm.jpg
 
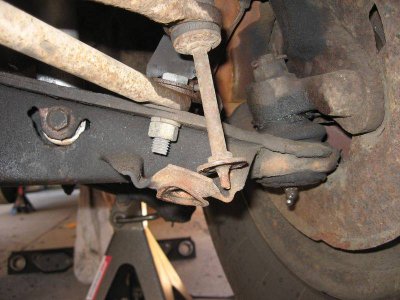
Next was the sway bar link. I noticed a while back that the driver's side link was broken off. When I looked at it more closely today, you could clearly see why: someone had hit something with the mount, and sheared it off.

IMG_3933-sm.jpg

I didn't take a picture of the other side for comparison, but the mounting tab is flat, not bent up like that one.

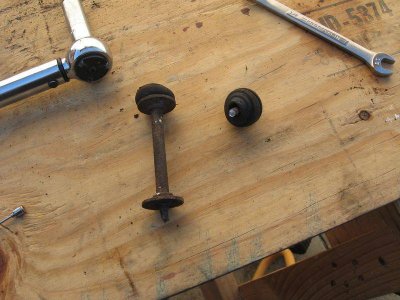
The top bolt was frozen on, and even with penetrating fluid, wouldn't unthread. Cranking on it just snapped off the head.

IMG_3934-sm.jpg

I bought two links, figuring I might as well replace both, since they're only a few bucks. Unfortunately, Rock Auto sent me the wrong parts, with these being clearly too long.

IMG_3935-sm.jpg

I'll be returning those, and bringing my old part to the local auto parts store to check for fit. If they won't pay for return shipping, I'll yell at them a bit for sport, but then probably put up a post here to give them away. I'm never going to have a use for them.

The car is still upon stands, and I'm going to try to find a proper link at a local store tomorrow. Since I didn't get a master cylinder in time, I'm not going to do my brakes. Instead, I'm going to try and get the fan and clutch installed, and maybe motor mounts if it looks like an easy job. But I'd be happy to get just the sway bar links and fan done.

IMG_3933-sm.jpg


IMG_3934-sm.jpg


IMG_3935-sm.jpg
 
Back
Top