Reverse light switch.

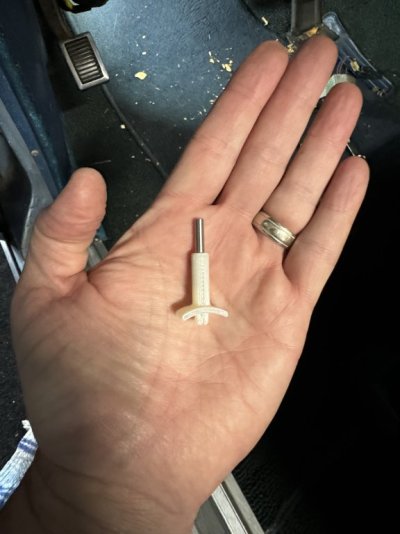
Good news on the reverse switch front. Finally got a legit 3D scan of the original and printed out some replicas. This batch was with the more brittle resin because that is what was already in the bath. It is a perfect copy:

View attachment 524985View attachment 524986
Good work!
I have a part that I need a duplicate of.
It’s a trim clip for a Buick Roadmaster Limited.
How did you get the part 3D scanned and what did you use for producing the new part?
 
How did you get the part 3D scanned and what did you use for producing the new part?
I can not lay claim to any of this success except with coming up with the idea.

The 3D scan was ultimately done by a dentist who is a friend of my friend who has the 3D printer. It is my understanding the there are quite a few ‘hacker labs’ at there which are generally like rentable workspaces for folks who like to build things. Look around in your area and see if there is one nearby. They may have a high end scanner (and someone willing to scan the product for you).

The printer itself uses a resin bath and ultraviolet light. It’s a really cool process to watch (time lapse). My buddy has one he uses for making a variety of small statues for things like dungeons and dragons, Christmas ornaments, etc. This version of the part I currently have was printed with a more brittle resin which is fine for what he normally prints. Since the part fit, I figured I’d use it until it breaks then have my buddy print some new ones with a much stronger nylon resin.

Once we print some of the stronger ones, I am sure I will Offer them up to the mopar crew here.
Thank you!
I don’t even know how the mechanical functions, yet.
I have a fsm and will review it before diving in.
 
I have to look and see which lever is used for the switch on mine but if it takes this one I would be more than happy to pat for it!
 
SPF, any updates on the 3D printed part?
If not, what do you think about sharing the 3D files? Maybe someone else could try it.
 
Hi there. No update on this side, sorry.

I will reach out to my friend who was doing all the leg work. I was the ‘idea man’ only.
 
Hi there. No update on this side, sorry.

I will reach out to my friend who was doing all the leg work. I was the ‘idea man’ only.
ok...Great.
wish I could get a printer and start playing...but the Mrs wouldn't be thrilled after all the parts/tools/money to get my Plymouth Fury running and on the road.
 
Attractive as a freshly made part would be, I think from a cost/benefit POV, I'd just tap a 1/4-20 stud in where the plastic pops up to move the switch. I did so, and it works perfectly.
 
Attractive as a freshly made part would be, I think from a cost/benefit POV, I'd just tap a 1/4-20 stud in where the plastic pops up to move the switch. I did so, and it works perfectly.
I looked into this when you suggested it originally too, but I think the column has to be out for that to work. And it has always been hard for me to see in the pictures I took, but the gauge of the metal where this pin pops in does not appear to be very thick? As in, how many threads can you actually tap in it.

Luckily for me here in CA, cars don’t need to be inspected to get the tags so I can be patient on my reverse lights.
The sheetmetal isn't terribly thick, but it's thick enough with a stop nut. I tapped that thing in IN SITU, using a short Klein drill tap chucked into a 1/4" socket driven by a 1/4" drive ratchet. Easy peasy! No column removal required. Now you DO need to be able to crawl down to the base of your steering column to effect this little repair. I can, despite advanced age and my overall size, thanks be to God, but many men in this country can't at half my age. You will have to assess yourself for that. Still, All Things Considered, the repair works very well, every day I drive which is 5/7 every week. So the metal is thick enough. Just do it carefully.
 
How did you tap the hole? did you remove the steering column to tap it?
See my other answer. It's really absurdly easy man. Other drivers use sheetmetal screws, but I like a tapped, machined product. If one botches the job, the sheetmetal screws remain an option.
 
See my other answer. It's really absurdly easy man. Other drivers use sheetmetal screws, but I like a tapped, machined product. If one botches the job, the sheetmetal screws remain an option.
Read both replies. Me n my bad back are going in. Not tonight but soon.
Thanks for your time and info.
 
The part came in this week. A rare rainy May day here so I went for it.

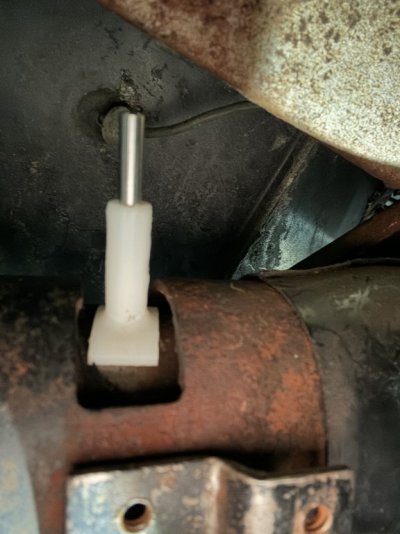
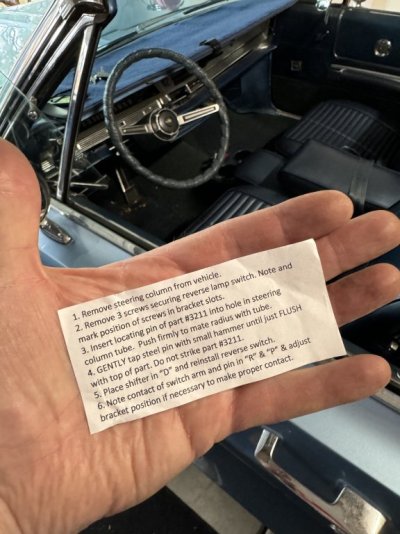
The instructions call for removing the steering column because the metal pin needs to be tamped in (it is a tight fit).

IMG_1126.jpegIMG_1127.jpegIMG_1128.jpegIMG_1133.jpeg
 
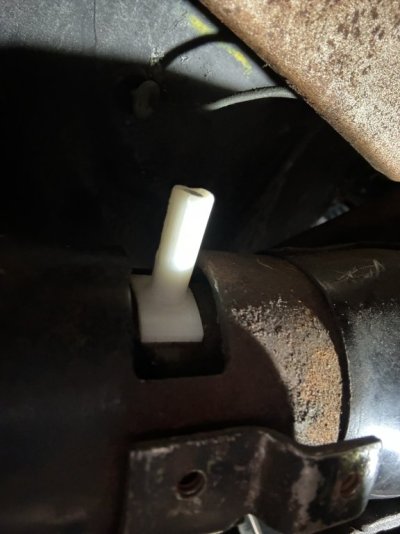
But I was not going to take out the column, so I used my biggest Chanel lock pliers and it just barely fit….

IMG_1129.jpeg


IMG_1130.jpeg

Switch reinstalled:
IMG_1131.jpeg
 
A little bit of adjusting with the column in Reverse and ….

IMG_1132.jpeg


SUCCESS!!

This pin feels way more secure than all the versions of the 3D printed versions I made. I think that metal center pin is the key.
 
I got mine at Saturday. A little difficult to install with column in the car but I did it with a c-clamp. Was nervous about breaking it but it worked.
I'd like to see it a little easier to push metal pin in but I'm sure the creators already tried that.
 
Back
Top