YES, YES, YES!!! Firm Feel Rear Sway Bar

SF-66TC

Well-Known Member
Joined
Oct 16, 2014
Messages
505
Reaction score
304
Location
san francisco
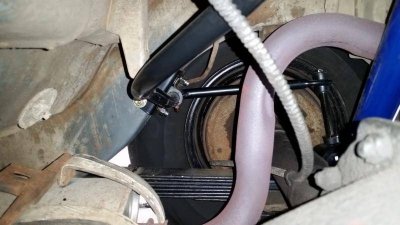
Just installed Firm Feel's Rear Sway Bar on my 66TC.
I'd say it's probably the BEST upgrade I've done other than installing Front Disc Brakes.

Body Roll is virtually gone, there is no longer that "boat" or "floating" feeling, there's no more wheel hops going over speed bumps and at speeds of 80 mph on the highway the car feels solid and steady.

If you decide on upgrading to one of these I've got some useful tips to make the install easier and more secure.
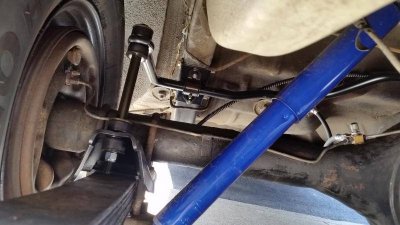
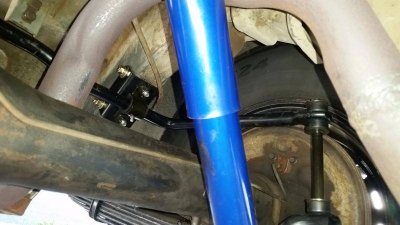
2015-09-05 10.57.47.jpg2015-09-05 10.58.20.jpg

2015-09-05 10.57.47.jpg


2015-09-05 10.58.20.jpg
 
That looks really good. And great news on the driveability improvements! Might have to consider one of their rear bars for my wagon. I have their front bar on my wagon.

Why not post up your advice here in the this thread, I know I and others would appreciate it.
 
I was thinking of putting a away bar in the rear when I put new springs in the rear next year. I'd love to know the tips you have to share with us.
 
I purchased front and rear sway bars from firm feel, I'm hoping to install them in the spring.(No pun intended.)
 
Firm Feels instructions are a bit vague and leaves a lot to the imagination so here’s my suggestion for installation after all my trial and error.


  • Unless you have an impact gun to loosen the lug nuts, break nuts loose before jacking up the car
  • Jack up rear end (pumpkin) and support car with jack stands under the body frame in front of the rear wheels
  • Lower jack until rear end drops completely then raise jack just enough to support it
  • DO NOT UNMOUNT SHOCKS!
  • Remove wheels
  • Pick a side Right/Left and remove axle to leaf spring U-Bolts
  • Install End Link Plates between bottom of axle and leaf spring with eyelets towards the rear. Both End Link Plates are identical so don’t worry about installing the wrong one on the wrong side.
  • Make sure End Link Plate is centered with leaf springs alignment pin protruding through its center alignment hole and sitting flush against leaf spring.
  • Install U-bolts and torque nuts
  • REPEAT END LINK PLATE INSTALLATION FOR OPPOSITE SIDE
  • Clean off both sides of the Frame Rails where the Frame Rail Brackets (FRB) are to be installed
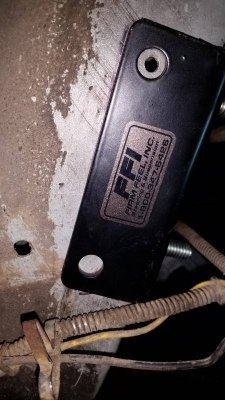
  • Note: Both FRB's are also identical with the exception of placement of the Firm Feel Sticker. Whichever bracket had the sticker facing outwards is how I chose which bracket to use for which side - again it does NOT matter, they are both the same. The brackets are tapered so match the taper of the frame rail - top being larger than bottom.
  • The instructions say to “slide frame brackets up cleaned frame rails until snug. From the top edge of the sway bar bracket to the front bump stop bolt; A,E bodies = approx. 1-1/2”, B bodies = approx. 4-1/2”, C bodies = approx. 5”
  • Note: THE ABOVE INSTRUCTIONS ARE NOT 100% ACCURATE. YOU WANT THE SWAY BAR PARALLEL TO THE ROAD AND END LINKS AS VERTICAL AND PERPENDICULAR TO THE LEAF SPRING AS POSSIBLE
  • I SUGGEST: You can use the the above measurements as a starting point, but since you will test mount the sway bar for proper alignment before drilling any holes you will need to make sure the FRB's are REALLY SNUG SO BUMP EACH BRACKET UP A WEE BIT HIGHER
  • Note: You may need to detach muffler mount from body mounting bracket to install sway bar
  • Install sway bar bushings onto sway bar along with sway bar brackets (zerk fitting pointing down) and TEST mount to FRB's including nuts.
  • Jack up rear end until car just lifts off stands (this will simulate the car on the ground)
  • Install End Links to both sway bar arms and align to End Link Eyelets (not necessary to install bottom bushing, washer & nut for this)
  • If the End Links ARE NOT VERTICAL & PERPENDICULAR to the leaf spring YOU WILL EITHER NEED TO MOVE THE FRB's HIGHER OR LOWER depending on the angle of End Links.
  • If the TOP of the End Links are positioned towards the FRONT of the car, you will need to move the FRB UP.
  • If the TOP of the End Links are positioned towards the REAR of the car, you will need to move the FRB DOWN.
  • When everything is aligned properly or to your satisfaction, MARK the position of the FRB by outlining them on the frame rails
  • Remove End Links, Sway Bar & Brackets from FRB's
  • The instructions say to "Drill a 3/16” hole and using a center punch to give holes a funnel shape and allow screws to barely start” - To do this to 8 holes is a Big Pain in the behind and utterly stupid. The frame rails are only about 1/8" thick and using the provided screws you'll probably only catch 1 or 2 threads which is nothing SO DISREGARD THAT INSTRUCTION!
  • I SUGGEST; Drill a 1/4” hole then increase to a 5/16” hole using the 4 FRB holes as your centering guide.
  • Secure FRB using the following hardware; (4) 5/16” 3-1/2” length GRADE-8 Bolts, (8) Flat Washers, (4) Lock Washers, (4) Nuts or (4) Nylon Locking Nuts. Using 3-1/2" bolts will clamp the FRB to the frame rail for a more secure and safe installation.
  • Pre-grease sway bar bushing, attach sway bar bracket and mount sway bar to FRB with supplied nuts
  • Install End Links and secure to End Link Plate Eyelets (ensure bottom nut is secure)
  • Re-attach muffler to mounting bracket if it was removed. If sway bar interferes with how muffler is mounted you may need to find a different way to secure the muffler.
  • INSTALL WHEELS AND GO FOR A TEST DRIVE AND HAVE FUN!


That looks really good. And great news on the driveability improvements! Might have to consider one of their rear bars for my wagon. I have their front bar on my wagon.

Why not post up your advice here in the this thread, I know I and others would appreciate it.
 
Last edited:
I agree with CanKritter on drilling where a welded seam exists. In my opinion "thru-bolts" at the midway point of the frame or welding is the best way to fasten the mounts especially with the vertical forces exerted by the bar as it flexes. I would worry about "tear-out" of the selftapping bolts over time - something even Loctite can't prevent.
 
How did your exhaust clear? I have 3" pipes going out the rear and wonder how much room I'd have.
 
Yatzee, I don't understand what you're referring to regarding "drilling where a welded seam exists". There is no seam near the area the Frame Rail Bracket is installed. The bracket itself is a good grade material and I did suggest using the "thru bolts" rather than the self tapping ones FF provided. IMO the thickness of the bracket combined with using the "thru bolts" is far sufficient in taking up any verticle forces of the bar.

Let me add that the holes of the brackets are 3/8" and for my application I drilled 3/8" holes to match so there wouldn't be any possible movement of the bracket itself. I suggested 5/16" simply because it would be a much easier installation than trying to match a 3/8" hole exactly.

The studs coming off the Frame Rail Brackets to support the sway bar brackets are welded to the bracket itself. It was my thought initially that it would be best to spot weld the FRB to the rails, but I'm not racing the car around and figured the bolts would be more than sufficient.

The hole size seen pictured below was the suggested 3/16" from the instructions. As I mentioned the bracket hole size is 3/8" and that's the size hole I drilled using a 3/8" grade-8 bolt.

2015-08-09 12.05.33.jpg

I agree with CanKritter on drilling where a welded seam exists. In my opinion "thru-bolts" at the midway point of the frame or welding is the best way to fasten the mounts especially with the vertical forces exerted by the bar as it flexes. I would worry about "tear-out" of the selftapping bolts over time - something even Loctite can't prevent.

2015-08-09 12.05.33.jpg
 
Last edited:
There was plenty of room to clear the exhaust even if I had 3" pipes. This weekend I'll shoot a better photo of the clearance if you'd like.

How did your exhaust clear? I have 3" pipes going out the rear and wonder how much room I'd have.
 
There was plenty of room to clear the exhaust even if I had 3" pipes. This weekend I'll shoot a better photo of the clearance if you'd like.

That would be helpful. I looked back through my pics when I installed my exhaust and I don't think it should be an issue, but it would be nice to see where it goes.
 
I installed a rear sway bar on my 72 Caprice.....I know what you mean... major night and day difference. I'll probably put them on both of my 78's.
 
Glad you are enjoying the new sway bar Steven. I know I love the one installed on Goldie. Great improvement.

Story about mine. My cousin has a new Cadillac ATS, he was following me on curvey road. Commented how flat she looked in the corners, was very surprised he needed to concentrate to keep up.
 
LocuMob,

As you can see from the photo there is plenty of clearance between the sway bar and the exhaust pipe - at least 5 inches.

This photo also shows a good example of why I did the write-up for installing FF's sway bar correctly. I went by their instructions and you can see where they failed me. As you can also see in the photo my end-link is NOT exactly VERTICLE. Had I done what I wrote under "I SUGGEST:" I would not have had this issue. If I move the Frame Rail Bracket (FRB) HIGHER by about 1-2 inches the sway bar ends would move towards the rear of the car enabling the end-link to be positioned PERFECTLY VERTICLE. That 1-2" extra would also have given me enough clearance to remount my muffler hanger to its factory location.

As I do not want to drill additional holes in the frame rail to correct the mis-aligned bracket, I will simply bring it to my buddies shop and use his drive-on lift. I can then easily remove the bolts, bump the Frame Rail Brackets upwards to align the End-Links verticle then have the brackets welded in place.

So if you have access to a drive on lift you can do the same, but first install the End-Link brackets that installs between axle and leafs. Even if you personally don't have access to a lift it really shouldn't take a shop longer than 1/2 hour to install and align the brackets, sway bar, end-links and weld on the brackets. Time is money and you'll save yourself a good amount of time not to mention saving your knees and back. Hope this helps - Good Luck!

20150912_150934.jpg


That would be helpful. I looked back through my pics when I installed my exhaust and I don't think it should be an issue, but it would be nice to see where it goes.

20150912_150934.jpg
 
Thanks SF-66TC! I will probably have to do the same thing you did, install it and have it welded later. I'll be replacing the springs come spring time and will throw the sway bar in at the same time.
 
Last edited:
Great thread, I'll be taking your advice when I install mine. Thanks for posting.
 
Back
Top