New Member, 1967 Imperial

It's been a while since doing any work, and that time is coming around again. On tap for this weekend is:

Replace all battery cables. Originally, I was just going to replace the one that runs from the battery to the starter, but I figured, why not do them all? It will only take a few extra minutes, and a few extra bucks, so for piece of mind, why not? (unless it's the NSS...)

Replace starter. Although my starter works, I thought I'd replace with one of the "mini" starters from a later car. I hear they turn over better, and I want to maximize my chances of getting a 10:1 440 to turn over on a hot afternoon.

Replace the alternator. When my car failed to start, I went by my local mechanic. He said that my battery was good, but my alternator was lazy at idle.

Battery tie-down. I've looked at pictures, and they don't seem to have been on these cars originally. But it's also under the "why not do it for peace of mind?" column.

Tie rod replacement. This is over-due, and I want to get my car aligned.

Not on my list for this weekend, but something I want to get done in August is get my passenger rear window sorted. It's out of alignment, and has stopped working. At very least, I want to get it set in the tracks straight so the car is reasonably water-tight and quieter on the highway. I've got a wedding to go to in West LA, and it will be about a 150-mile drive. I'd like it to be as quiet and Pimperial-like as possible.

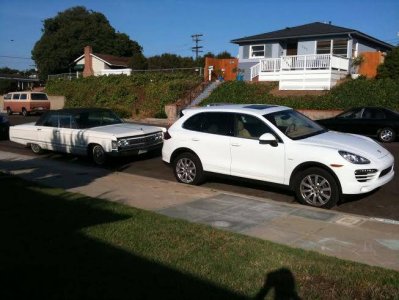
And, relevant to nothing, I wet to my brother's house for dinner last night. My mom was there, and she has a thing for white cars, too. She is just buying in a different price range than I am.

white cars.jpg

white cars.jpg
 
Like the VW van behind there, stuff just does not rust out there as evident in my barracuda an Challenger with no rust.
 
How everything since the new isolators?? Your car most certainly had a battery hold down when it left the showroom.
 
Wow, your huge Imperial looks kind of tiny compared with the Cayenne! ;)

It's totally a figment of the wide angle on a cell phone camera. My car dwarfs her car. But I did notice that most of the features her car has mine had 40 years before. Hers just work....

How everything since the new isolators?? Your car most certainly had a battery hold down when it left the showroom.

New isolators are awesome, especially combined with the new swaybar link. Really drives nice. It made a difference not just in eliminating the "clank" but also reduced the amount of cowl shake when going over bumps. Or maybe it didn't, but without the loud noise calling attention to it, maybe I just don't notice. Either way, it's good.

I would have thought there was a hold-down, too. But I remember seeing something, somewhere. Or thought I remembered seeing something somewhere.... But as long as we're on the topic, I don't want to get scolded later for "geez, at least you could have bought the correct hold-down...." Is there a "correct" hold down?
 
When I ordered one for my car this is what I got. It fits the factory holes perfectly so I didn't question it. From Roseville Moparts.
Im going to have my isolators redone this winter. I got the info off this thread, thanks. At this point I think only one of mine is actually bad but mine makes some serious clunking noises under a little more than normal acceleration.

image.jpg


image.jpg


image.jpg
 
The Autokraft "Silver" Edition battery. How thoughtful. ;)
 
When I ordered one for my car this is what I got. It fits the factory holes perfectly so I didn't question it. From Roseville Moparts.
Im going to have my isolators redone this winter. I got the info off this thread, thanks. At this point I think only one of mine is actually bad but mine makes some serious clunking noises under a little more than normal acceleration.

I'll check out Roseville, thanks.

I was told that winter is the right time to do the isolators. The vulcanizing machine (an ex-Chrysler prototyping piece) is really freaking hot, so they don't like running it in the summer. They let orders back up a bit so they can run them all at once. It's not so unpleasant in the winter, so they turn them around faster. I forget the name of the guy I talked to, but he was the owner. (Just went through my email: Tom Hannaford.) If you have a chance, get him on the phone. He's a nice guy. Very helpful.

Have you looked at the second set of isolators? On a different parts diagram, I came across another set: They are a stubby steel tube with a rubber isolator inside. I haven't looked at mine, but I did find a guy who had a set. I never really sorted out if I needed them or not.
 
A bit of a frustrating day, but progress was still made. I have these tasks for this weekend:

Change alternator
Replace battery cables
Replace starter
Replace tie rods
Jury-rig heater so it's not on

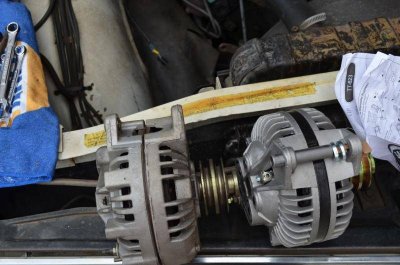
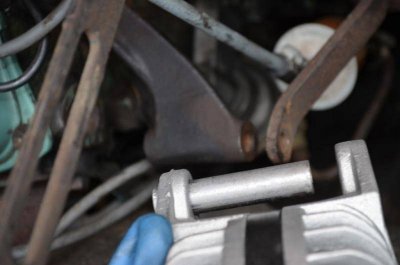
I started with the alternator. Pretty easy unbolting, right? Unfortunately, my new alternator wasn't the same as my old alternator. The new alternator had a long collar lightly pressed into the base bolt hole. It was about 2-1/2" long. Looking at it, I figured there was no way it was going to come out of the bracket that holds the alternator to the head.

{-sm}_10.jpg

So I unbolted the alternator from the head. Two of the bolts came out wet.

I freaking hate Chrysler engineers. Why on earth couldn't they make those holes blind? Instead they have to go into the water jackets. I had this problem on my Dart. Grr. I remembered the hassle getting that to seal, so I just went ahead and used teflon tape right off the bat. Hope that wasn't a mistake.

Then, when I looked at the bracket, I realized that there was no way that collar was going to make its way into the bracket like it was set into the alternator. So I swapped the shorty collar from the old alternator onto the new one.

{-sm}_15.jpg

As long as it was off, I decided to degrease it and the front of the head. Not super-clean, but enough to see turquoise and casting numbers.

{-sm}_12.jpg{-sm}_13.jpg

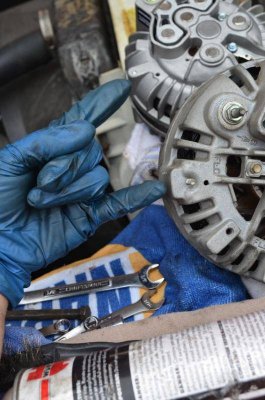
As I mentioned in my thread on alternators, my new alternator doesn't have the same attachments as my old one, but thanks to 65Sporty, I figured out a jury rig of splicing a wire to get my ground until I get to the store and buy proper wiring. The old alternator had a ground wire on that bolt extending up through the case. There was no corresponding bolt on the new alternator.

{-sm}_16.jpg

After that, it started raining. To those in other parts of the country (or world), that may not sound like a big deal. But this is Southern California, and it Just. Doesn't. Rain. in the summer. I'm working outside in my alley, and it stats pouring.

During a break in the rain, found I couldn't get to the starter with the car on the ground, so I borrowed a set of ramps (I sold my old set, because I thought I'd never need them again....). I got the starter out, but man, there's no extra room in there is there?

I'll post more about it tomorrow, because the later pictures weren't downloaded. But basically, the new starter went in, except for the electrical connections. They stood too proud, and wouldn't fit against the block. More about that later.

Until then, here's a picture of my workshop. It's a 1-car garage that is full of things that are not cars. It's pretty bad now, but it was way worse three months ago. I took three days and pulled everything off the floor, installed shelving, and put stuff on the walls in some semblance of order. If I can make some progress on house projects, I think I can clear enough space in the center to get the Imperial in. I won't have much space to work on it, but if it comes to a major project, like pulling a motor, it would work.

{-sm}_4.jpg

I also looped the heater hoses so my heater isn't always on.

It's so lame. I worked all day, it seems, but only got an alternator swapped, and the starter half in. And both kind of half-assed. Arrg.

Tomorrow, I'll finish the cable replacement, wire the starter, fix the wiring on the alternator, and see how much time I have. I don't want to put off my tie rods again, but I have a yard to mow. I might just have to suck it up and take my parts to the alignment shop and have them install the tie rods at the same time as I get my alignment done. I don't want to pay for it, but I also don't want this job hanging out there any longer.

Once again.... arrrg.

{-sm}_10.jpg


{-sm}_12.jpg


{-sm}_13.jpg


{-sm}_4.jpg


{-sm}_16.jpg


{-sm}_15.jpg
 
Those holes are blind you just have some seep from valve covers or someone oiled them when they put them in, on the drivers side head those face the fire wall with nothing in them.
 
Those holes are blind you just have some seep from valve covers or someone oiled them when they put them in, on the drivers side head those face the fire wall with nothing in them.

Well then I apologize to any Chrysler engineers who were reading this and were offended. :)

As I mentioned, it was raining here yesterday, and I had lost enough time, so I simply used an umbrella.

DSC_0984.JPG{-sm}.jpg

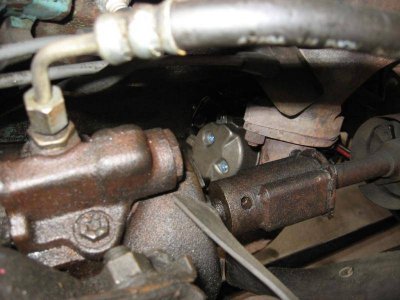
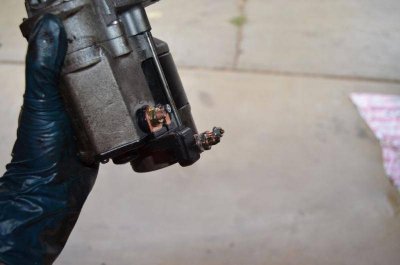
When reading up on the new starter, there was some discussion that it didn't fit, and would need to be trimmed. As it turns out that wasn't quite necessary. If you look at the bottom of the unit, you can see that the connection posts have a Z-shaped connector on them to move the connections and offset them from the body. It turns out that this is what contacts the block. These can be removed, and then the starter fits.

DSC_0985.JPG{-sm}.jpg

The problem is that when you install the starter, those posts are on top of the starter, and not accessible from the side or bottom. So you need to do it by feel, and not lose any of the nuts into the crotch between the solenoid and the motor. Or if you do, you will need a mirror and a flexible magnet to fish them out (yes, I said 'them').

Since someone makes an offset for these already, someone should make another offset so that it will work on a 440. I'd pay a premium for one of those.

I got the starter in yesterday, but it was nearly 6:00 with the rain delay, and I had company waiting for me to cook, so I delayed until this morning.

When I got back to it, I could see that the cables were the starter cable, the charging wire, which peeled off after 6", and the solenoid wire which came into the bundle where the charging wire peeled off. To my inexperienced eye, it looked like the original wrapping. Fabric, with no real insulating properties (not that it needed it).

I cut the fabric casing and separated the cables.

IMG_0903.JPG{-sm}.jpgIMG_0904.JPG{-sm}.jpg

No real pictures of me trying to get the nuts in place, but it took about an hour and a half. The wires were just long enough to fit, because the posts were rotated a few inches further away from the original location. If I were making a cable from scratch, I'd add another 4" of length.

I don't know if you can really tell, but I held the camera and pointed up. This shows what you can see of the starter. That's the driver's torsion bar, transmission and linkage. You need to thread your arms up through there and get each nut on with one finger from each hand. Luckily there is room to swing a shorty wrench. Open end works on the starter, and box on the solenoid.
IMG_0909.JPG{-sm}.jpg

View from the top: not getting at it that way, either.

IMG_0911.JPG{-sm}.jpg

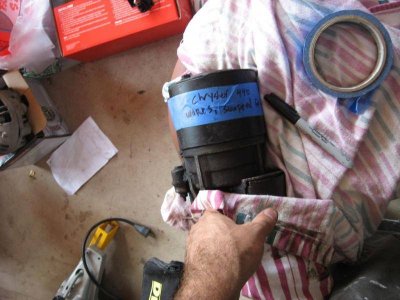
After that, I snapped the little plastic keepers back in place and cleaned up. Since both the starter and alternator work (alt just a little lazy at idle), I kept them, and marked them for future reference.

IMG_0912.JPG{-sm}.jpg

I don't know why, but I did. Maybe someone from the board will be stranded in San Diego with a bad starter, all the parts stores will be closed, and a free used starter will get him back on the road.

Or I'll just end up throwing it away in 20 years.

But I decided to stop there, because I didn't really have time to get to the tie rods. As I mentioned before, I think I'll just pay to have it done, since it really shouldn't be put off any longer, and I just don't have time to do it before I take it to LA later this month.

One other thing I've read is that the starter sounds totally different than the original starter. It totally does. It's way faster. Most of the time, I can't believe the car is actually running it's so fast. However, it did not solve all of my hot-start reluctance.

If the car is hot, and has some time to sit, so the heat soaks in, it won't fire right off, and I need to open the throttle all the way, and it will catch. I suspect tuning at least partially related to my suspected vacuum leaks.

Oh, almost forgot. Now that the heat is off, I decided to turn on the air because it was muggy today. It doesn't work. F---! It worked when I bought the car. That was one of the things that convinced me to buy it. I'm hoping that it will be fixed when I start investigating vacuum, since I understand that vacuum drives a lot of the ATC stuff.

But that is a problem for another day.

DSC_0985.JPG{-sm}.jpg


DSC_0984.JPG{-sm}.jpg


IMG_0903.JPG{-sm}.jpg


IMG_0904.JPG{-sm}.jpg


IMG_0909.JPG{-sm}.jpg


IMG_0911.JPG{-sm}.jpg


IMG_0912.JPG{-sm}.jpg
 
What Wil said x2. I've done this countless times....in the dark, in the dead of winter, in a parking lot, and on the side of the road in the NJ pine barrens (scary) AND with the wind blowing,LOL. But I do it for one reason.
NOTE: there is special tape you can buy at any Autozone or AAP that you can use to rewrap those cables. It is double sided and is about 10bucks. It is heat activated (sort of) so when you are wrapping the cable the tape will hold itself together. It looks much like the factory tape only brand new. I used it a few months ago.
 
Well then I apologize to any Chrysler engineers who were reading this and were offended. :)

As I mentioned, it was raining here yesterday, and I had lost enough time, so I simply used an umbrella.

View attachment 36121

When reading up on the new starter, there was some discussion that it didn't fit, and would need to be trimmed. As it turns out that wasn't quite necessary. If you look at the bottom of the unit, you can see that the connection posts have a Z-shaped connector on them to move the connections and offset them from the body. It turns out that this is what contacts the block. These can be removed, and then the starter fits.

View attachment 36120

The problem is that when you install the starter, those posts are on top of the starter, and not accessible from the side or bottom. So you need to do it by feel, and not lose any of the nuts into the crotch between the solenoid and the motor. Or if you do, you will need a mirror and a flexible magnet to fish them out (yes, I said 'them').

Since someone makes an offset for these already, someone should make another offset so that it will work on a 440. I'd pay a premium for one of those.

I got the starter in yesterday, but it was nearly 6:00 with the rain delay, and I had company waiting for me to cook, so I delayed until this morning.

When I got back to it, I could see that the cables were the starter cable, the charging wire, which peeled off after 6", and the solenoid wire which came into the bundle where the charging wire peeled off. To my inexperienced eye, it looked like the original wrapping. Fabric, with no real insulating properties (not that it needed it).

I cut the fabric casing and separated the cables.

View attachment 36122View attachment 36123

No real pictures of me trying to get the nuts in place, but it took about an hour and a half. The wires were just long enough to fit, because the posts were rotated a few inches further away from the original location. If I were making a cable from scratch, I'd add another 4" of length.

I don't know if you can really tell, but I held the camera and pointed up. This shows what you can see of the starter. That's the driver's torsion bar, transmission and linkage. You need to thread your arms up through there and get each nut on with one finger from each hand. Luckily there is room to swing a shorty wrench. Open end works on the starter, and box on the solenoid.
View attachment 36124

View from the top: not getting at it that way, either.

View attachment 36125

After that, I snapped the little plastic keepers back in place and cleaned up. Since both the starter and alternator work (alt just a little lazy at idle), I kept them, and marked them for future reference.

View attachment 36126

I don't know why, but I did. Maybe someone from the board will be stranded in San Diego with a bad starter, all the parts stores will be closed, and a free used starter will get him back on the road.

Or I'll just end up throwing it away in 20 years.

But I decided to stop there, because I didn't really have time to get to the tie rods. As I mentioned before, I think I'll just pay to have it done, since it really shouldn't be put off any longer, and I just don't have time to do it before I take it to LA later this month.

One other thing I've read is that the starter sounds totally different than the original starter. It totally does. It's way faster. Most of the time, I can't believe the car is actually running it's so fast. However, it did not solve all of my hot-start reluctance.

If the car is hot, and has some time to sit, so the heat soaks in, it won't fire right off, and I need to open the throttle all the way, and it will catch. I suspect tuning at least partially related to my suspected vacuum leaks.

Oh, almost forgot. Now that the heat is off, I decided to turn on the air because it was muggy today. It doesn't work. F---! It worked when I bought the car. That was one of the things that convinced me to buy it. I'm hoping that it will be fixed when I start investigating vacuum, since I understand that vacuum drives a lot of the ATC stuff.

But that is a problem for another day.

Not trying to be smart here, but once you had your old alternator and starter out and saw that they weren't the same as the new units you bought, why didn't you take them back to get the proper ones? Or, conversely, why not rebuild your existing units? I had a car with what I would charitably call a "lazy" starter and took it in to a local shop and just had them install a high speed armature into it and the engine now turns over like a top.

As for your continuing problems with hot re-starts, the small block engines were famous for plugging the crossover passage in the intake manifold and you may be experiencing some of that with your 440. Basically the heat soak is boiling the gas out of the carburetor and it just pools and puddles in the chamber in the intake under the carb. That produces an ultra rich condition, which you're dealing with (correctly) by holding the throttle wide open to clear all of that. Once the mixture returns to a burnable ratio, the engine fires and you're good to go.

Another part of the problem with the re-starts may be contamination in the carb. Ethanol based fuels attract water, which forms in the gas tank and starts to rust the tank from the inside out. The rust is extremely fine like baking flour and there's no easily adaptable fuel filter that will catch it. My guess is if you open up the carb, you'll find a fine tan silt in a lot of places inside. That's the rust. A carb kit and a good soak in carb cleaner and you'll be back in business.
 
I knew the starter was different. I was specifically going to the mini starter because I understood it to be a better design: using less current, spinning faster, and being a longer-lasting piece. As I have mentioned several times, I don't really have an option of having the car in a non-operable, non-movable state for very long, so taking the starter out, having it rebuilt, and having the car sit without being able to move it is just not really an option. So while I was unaware that the starter could be rebuilt with higher output, I would have made the same decision. Plus, when I eventually move to dual exhaust, it will be easier to route past the smaller starter.

Regarding the alternator, the same thing applies: I have a very limited time to get the work done. If the issue is re-routing a ground wire, I'm fine with that. I just want to get confirmation that my suspicions were correct about it.

The hot start issue is unlikely to be from a buildup over time, since the carb is new, and the problem appeared early on.

Your description about the gas vaporizing and puddling makes sense. The pattern is such that if it's hot, and I just stopped it, it starts right up. It's only when it's had a chance to have the heat soak in that I have problems. I had imagined that the fuel was vaporizing out of the float bowls, and I was waiting for new gas to be pumped in, but the puddling and rich condition makes as much sense.

I'll check out the issue of the cross-over, but I don't understand how that would cause it to increase the heat. Can you explain?
 
It would seem to me that if you blocked the exhaust passage under the intake and kept that heat away from your carb you would keep the underhood temps down as well as the temp of the carb itself. I wish I would have blocked mine but I didn't even think about it when I had it apart. It didn't take long to bake the paint off that part of the intake.
 
Back
Top