Convertible Fury - 1970

I found a video of the top retracting on a 1967 Fury. Is the mechanism basically the same on mine? I ask because mine is up and not functioning and I want to lower it manually. In the video it looks like the entire top cantilevers up until nearly vertical and then it accordions up. Thus, you wouldn't start by lifting directly at the front.
It's going to be pretty much the same. On my 70 300, the top goes up and then folds forward as you describe.

Unhook the cylinders and it should go up and down pretty easy.
 
It's going to be pretty much the same. On my 70 300, the top goes up and then folds forward as you describe.

Unhook the cylinders and it should go up and down pretty easy.

I have 69 Polara and during restoration I had the top out of the car, unfolded. Once I needed it fold it down for transport and all it took was connect the battery to the engine direct. Different polarity changes the direction.

Take out the rear seats, disconnect the cables up front to the connector in dash and give it try with the battery. If hydraulic system is ok, it take 45 second. If you would need, I can probably make a video over weekend of mechanism running.
 
That's an add-on.

Looks much better all cleaned up and with a plate instead of a farm hitch. The plates came on my 1942 Plymouth, but are the correct vintage for this car.

20160906_180515.jpg
20160906_180505.jpg


Any idea what the two bolts are for that are shown in Wollfen's picture? The heads are visible in the picture where he is holding the plate down.
 
Looks much better all cleaned up and with a plate instead of a farm hitch. The plates came on my 1942 Plymouth, but are the correct vintage for this car.

View attachment 91781 View attachment 91782

Any idea what the two bolts are for that are shown in Wollfen's picture? The heads are visible in the picture where he is holding the plate down.
If you are talking about the red painted heads further out to the side they are in fact rubbers for the plate holder to rest against.
 
I have 69 Polara and during restoration I had the top out of the car, unfolded. Once I needed it fold it down for transport and all it took was connect the battery to the engine direct. Different polarity changes the direction.

Take out the rear seats, disconnect the cables up front to the connector in dash and give it try with the battery. If hydraulic system is ok, it take 45 second. If you would need, I can probably make a video over weekend of mechanism running.
 
Thanks, maybe I will try this. Are you saying that I should connect a jumper wire directly from the battery to the top motor?

On a related note, by removing all the torn up pieces of the top I was able to take a look behind the rear seat. I was happy to see the build sheet, although it looks like it is in pretty bad shape. Another good reason to take out the back seat.
20160903_160141.jpg
 
If you are talking about the red painted heads further out to the side they are in fact rubbers for the plate holder to rest against.
Yes, that is what I was talking about. Thx for the clarification.
 
Thanks, maybe I will try this. Are you saying that I should connect a jumper wire directly from the battery to the top motor?

On a related note, by removing all the torn up pieces of the top I was able to take a look behind the rear seat. I was happy to see the build sheet, although it looks like it is in pretty bad shape. Another good reason to take out the back seat.
View attachment 91787

I found some old photos below. You should have the same setup, the engine for the top have only 3 wires, grounding and + with -. Disconnect the wires going to the dash, jump wires from the battery and you should fold it down easily, if the system is operational.

EDIT: it looks you found your way to top engine from the trunk compartment

0f82274e98.jpg


0f825c7683.jpg


0f82768640.jpg


0f827a73dd.jpg
 
Last edited:
Thanks, I really like the interior too. I'm not sure what carb it has. I'll look this weekend. I washed one of the door panels with a wet rag and it looks a lot better. This is my favorite part of getting a new old car.

Friend of mine have the same interior in his Fury 70, which is painted with custom green paint. Just a little inspiration below, if you decide its time for a new paint. This car was mine inspiration for C-body love.

IMG_0810.jpg


IMG_0777.jpg
IMG_0779.jpg

IMG_0750.jpg
 
Wow! I wish my interior looked like that! Thanks for the pics of your convertible work and of the green car too.
 
I finally was able to remove the rear seat cushion and it wasn't a pretty sight. After some scraping and vacuuming, it doesn't look quite as bad as I thought. No obvious rust-through spots at least.

For removing the back of the rear seat, I see the two bolts at the bottom. For the top, do you have to separate the seat from the back trim to lift it out? It looks like the trim is fastened to the car and the seat fastened to the trim.

Also, can all seat belts bolts be removed without any concern? I didn't remove the roll up belts on the sides because the bolt goes into the frame rail and I can't see the back. I worry that the bolt goes into a fitting that might move, making installation difficult or impossible.

20160910_170848r.jpg
20160911_184326r.jpg
 
That floor looks solid. Your best bet is to hit it with some rust converter then put a coating on rustseal in place. Lots of people use Por15 but I use KBS coatings because it is the same formula, is a bit cheaper and also come it a big range of colors compared to Por15. There is an off white rustseal you can paint directly on and it will self level so there are no brush strokes. Perfect for this area.
RustSeal - Rust Prevention - Stop Rust Paint
 
Spray some penetrating oil on the seat belt bolts and let them soak a day or two. They just screw into an insert welded to the floor.
 
Bingo!
20160913_201431.jpg

I'm very happy to find this in such good condition. I got very lucky because there is a second sheet that is in much worse condition, but it is blank except for some handwritten notes on the back. This one has all the data printed on it.
 
How do you remove the rear kick panels? There are two holes below the arm rest but no visible fasteners. Are there phillips screws hiding back there somewhere, and are there some clips along that bottom that just pull out of holes in the sheet metal?

I'm having a fun time with the sill plate screws. I thought those would be easy to remove but only 3 of the 8 screws will turn, even after a couple weeks of PB Blaster. I have to drill the rest out.

Thx.
 
up through the bottom of the arm rests for the kick panels. on the sill plates i had to use a hand impact screw driver, foul language and patience


How do you remove the rear kick panels? There are two holes below the arm rest but no visible fasteners. Are there phillips screws hiding back there somewhere, and are there some clips along that bottom that just pull out of holes in the sheet metal?

I'm having a fun time with the sill plate screws. I thought those would be easy to remove but only 3 of the 8 screws will turn, even after a couple weeks of PB Blaster. I have to drill the rest out.

Thx.

There are large phillips screws in those two holes. They are kind of deep and a little hard to get the screwdriver tip in, but they are there. There's a slot down by the seat belt anchor so you have to lift the armrest straight up. That will remove the armrest.

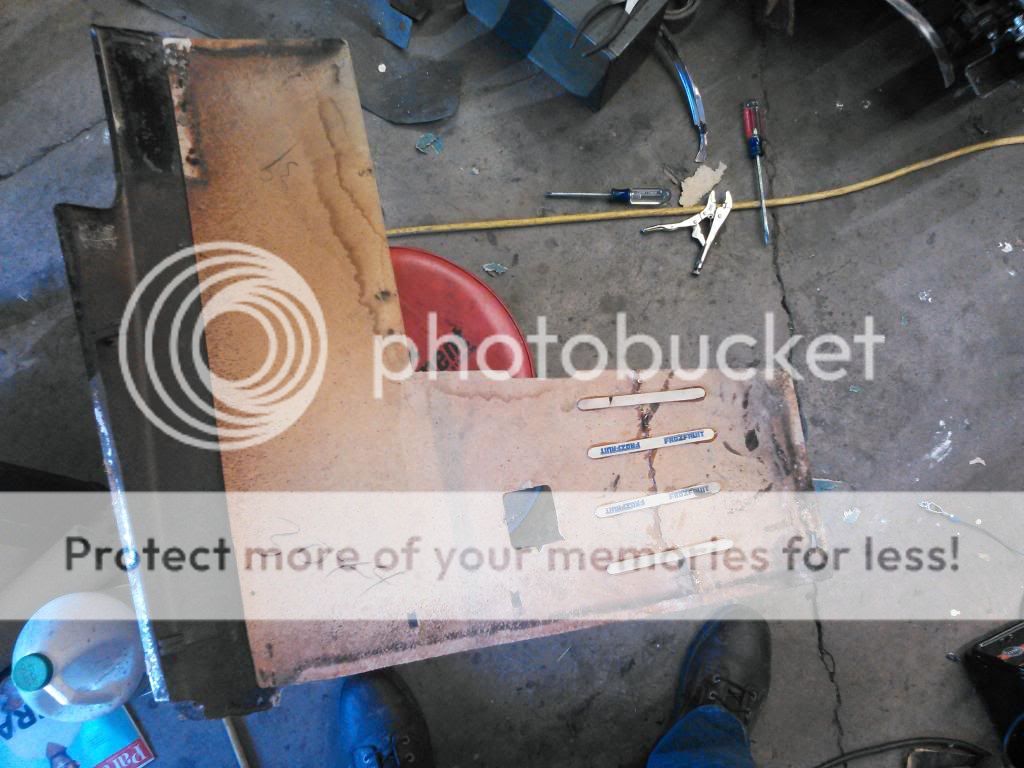
The kick panel is held in by clips at the front of the panel and it needs to be gently unclipped from the bottom up. Then it will lift up and towards you.

Here's a pic of the back of one of my old panels. See the rectangular holes near my feet. Those are where the clips are. Ignore the Popsicle stick repair from one of the previous owners.

 
For the sills, if you have to, you can drill new holes. Just move the plate forward or back until it still looks "right" and drill new holes.
 
Thank you both!! I need to get me one of those impact screw drivers.

I was able to get the sills and one of the arm rests off last night. I think I can probably leave the rear panels in place. I have to be careful not to take too much off! The purpose of this project is to fix rust spots on the floor, not to end up with a basket case.
 
Last edited:
It's amazing how much rust there is on the back of the armrest, compared to behind and below it. It must have been an unpainted surface. I didn't realize there was a light back there. I thought the visible face plate was just a decorate element. Is it supposed to light up when the doors are open?

There is a series of metal plates along the sides of the floor, behind which are wire bundles. Are those just affixed to the car with body sealer?

20160919_201431.jpg
20160919_202320.jpg
 
Back
Top