Here's one for the books. Formal dash in a fusie?

100_0152.JPG


100_0091.JPG


Quite different Huh?

I think! I am up to the radio. I found the clip I was looking for. . . Eherenberg just so happened to have them on eGay. Stan the Man found them for me. Thanks Stan (Commando1)

I made this up to do the offset in the difference in the heaterbox and the defroster ducts.

My wife complains because I keep this stuff laying around, but here's another example of fabrication. The offset is about an inch out and an 1/2 down.

100_0153.JPG
 
Are you going to leave that steering wheel and column in or are you going to put a T&T setup in her? Might as well since you are doing major surgery on her.
 
I bought a clip myself. My next major project is to start collecting all the stuff convert my A/C over to a modern system that will keep the interior at Arctic levels. Dump the ATC II, new everything including a parallel flow condenser with a pusher fan and a high output Sanden compressor.

Sent using Forum Runner
 
Are you going to leave that steering wheel and column in or are you going to put a T&T setup in her? Might as well since you are doing major surgery on her.

For now I am leaving that column. I am looking for a T column, not a T & T. But not this year. This will work fine for now.

I have one I took out of a 5th ave, but it's the wrong color. Maybe just a nicer steering wheel would work.
 
I bought a clip myself. My next major project is to start collecting all the stuff convert my A/C over to a modern system that will keep the interior at Arctic levels. Dump the ATC II, new everything including a parallel flow condenser with a pusher fan and a high output Sanden compressor.

Sent using Forum Runner

Polaraco has all that already. I am using the Sanden and the condensor from the Vintage air which is a pretty good size.

I'll tell you what will help big time is to put some electric pushers in yours. When I connected the electric fans with the AC, I saw a BIG difference, Even on the highway. It's a good start
 
For now I am leaving that column. I am looking for a T column, not a T & T. But not this year. This will work fine for now.

I have one I took out of a 5th ave, but it's the wrong color. Maybe just a nicer steering wheel would work.

Just my opinion... a Grant solid wood steering wheel would really look sharp in her.
 
I bought a clip myself. My next major project is to start collecting all the stuff convert my A/C over to a modern system that will keep the interior at Arctic levels. Dump the ATC II, new everything including a parallel flow condenser with a pusher fan and a high output Sanden compressor.

Sent using Forum Runner

Stan,

Please post a step by step pictorial (C-bodies for Dummies format) when you do the conversion similiar to what you did with the body repair on th other website.
 
Well Boys!

I am grateful for your help. I am over the hump now.

The last major dash project was installing a new radio and adding larger speakers to the dash. I have 5 out of 6 speakers finished. It sounds awsome. Much better than the last radio. 4 more solder joints and I'm on my way to completion. I should have the dash finished by Tuesday. Then I get to play with the pilar covers. The inner halves go right in perfectly, but the outers seemed to be an issue.

I still have to connect the bells and whistles for the computer. I also have a few warning devices installed with warning lights. I can tell when the fans are down, I have a manual override, Overdrive Lockout, check engine light. In the engine bay, I need to make an AC harness for the compressor, and I still have not tied in the headlights. But I have it simplified in my mind. (What there is of it) AC Hises are a snap. I need to modify one existing hose to close that up. Put in a new dryer and I'm off and running. I am way over schedule on this thing.

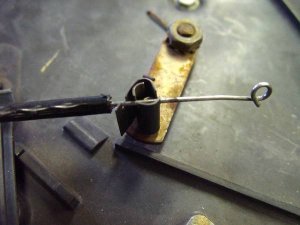
I decided not to wait for the clip to come. I have another project that has them and I know one is missing anyway. I used a 1/4" drill stop, (I had 4 of them) and a cut down 8/32 screw. I put the screw through the eye on the end of the cable and cranked it down. The threads were taperd differently to hold the set screw in place, so turning a machine screw was hard. But I lock-tited it anyway. Worked perfect! Baffle is in, all I need to do is pad put the seal and put the pad on.

Stan, you old coot. Thanks for all those pages you posted. Owe ya one.
 
You owe me one more...

2w3vzn9.jpg

For what it's worth, that is the dumbest way I could possibly imagine to attach a cable to a lever.
WTF were those engineers smoking back then...

2w3vzn9.jpg
 
Last edited:
You owe me one more...

View attachment 3975

WTF were those engineers smoking back then...

The same stuff we did when we took engineering. LOL

I just used a 1/4 drill stop and an 8/32 screw. I put it in the eye at the end of the cable. Perfect.

Anyway
DOES ANYONE HAVE A GAUGE CIRCUIT BOARD? I have the warning lights.

I tried the ground, I tried a new regulator, I pulled the board out and tested it, checked each trace with a magnifying glass but they continue to read too high. Mine is from a 77/78 Newpie. Temp on top, ammeter middle, and fuel on the bottom. There's a cap on the inside behind the ammeter. That may be the culprate
 
I forgot about the progress. The weather has been bad all week

Radio is in, dash pad is in, but the gauges are broke so I am at a standstill. I can't do the lower valance until I get the gauges working right

Oh yeah Stan. I got my clips too
 
The new VR I bought at a parts store was junk itself. 35 bucks down the drain - no returns on electrical components.. Grrr..
Bought a NOS one from that guy in Joisey, Brad's NOS. That worked.
You know how to test the VR, right?

Those freakin clips. Couldn't figure out how it worked. Had to ask Rick.
 
Yeah but I didn't bother. I bought a new one a while ago and had a couple of old ones.

It has to be something in this boardm but it looks fine
 
And I bet you didn't do a continuity test from the pin to throughout the circuit, either...
And check the plug that goes into the board connector.
Then it has to be a bad plug/connector connection.
I found on one board I had, there was juice at the female plug but no juice on the circuit side of the male connector pin.
 
Last edited:
I found a work around for this. I suspected it was a grounding problem. The ground to the Regulator was bad. The new reg had a fround tab on the back. But I needed to double ground it because the ground has to be seen by the gauges I guess.

So the fix, for future reference, was to ground the black wire on the plug and loop it to the voltage limiter, to a chassis ground. Now they work correctly.

I'm down to the computer wiring and warning lights I added. I am scraping the console I made 5 years ago and going to make a small panel to hang under the dash. It will house the extra gauges, window switches and the computer stuff. It will probably take a day to make the consolett and another day to complete all the wiring. I forgot to connect the seats to power too. Good ol' Bobby did not do what I tiold him to do so I have to fish the wiring under the carpet to connect that.

Thanks Stan
 
And I bet you didn't do a continuity test from the pin to throughout the circuit, either...
And check the plug that goes into the board connector.
Then it has to be a bad plug/connector connection.
I found on one board I had, there was juice at the female plug but no juice on the circuit side of the male connector pin.

Everything checked out! I know what you are saying. I had a good ground out of the plug. eveything was nominal. Somewhere in the plug to the limiter there ia a problem. Like I said, I didn't bother to check the limiter. It's 30 years old. Considering what a PITA it is to change, I decided to just replace it
 
Can you take a quick pic and show what it currently looks like?
 
Back
Top