looking sweet I know the feeling I've got parts everywhere, good idea hanging some on the wall. I love the silver I think it should be on the whole car though.
You are using an out of date browser. It may not display this or other websites correctly.
You should upgrade or use an alternative browser.
You should upgrade or use an alternative browser.
The sub frame project has begun..
- Thread starter mr. fix it
- Start date
mr. fix it
Old Man with a Hat
looking sweet I know the feeling I've got parts everywhere, good idea hanging some on the wall. I love the silver I think it should be on the whole car though.
Understood. I could name it the silver bullet then! or the silver slab..
Wonder what interior colour would work with silver.. Silver on silver maybe or dark grey.
mr. fix it
Old Man with a Hat
So i have the stub frame mounted loosely right now,
I want to know how close is close enough to consider the frame aligned up.
Using a criss crossing measurement from the front of the rear dog leg where the rear spring attaches I get a measurement of 151" going rear left to front right corner of the stub.
From rear right to front left of the stub I get 151 1/4".
I know the book calls for me to mount a jig on the rear of the frame and a jig at the front for reference but I don't have one right now.. I can make one if needed.
commando1
Old Man with a Hat
Do you really believe all those collision shops back in the day used jigs?
"How's that looking, Howie"
"Looks close enough for me, Lenny"
"How's that looking, Howie"
"Looks close enough for me, Lenny"
Ironwolf
Senior Member
Do you really believe all those collision shops back in the day used jigs?
"How's that looking, Howie"
"Looks close enough for me, Lenny"
Won't see it from my house !!!
mr. fix it
Old Man with a Hat
Do you really believe all those collision shops back in the day used jigs?
"How's that looking, Howie"
"Looks close enough for me, Lenny"
Thanks
I had to ask..
polara71
Old Man with a Hat
Wasnt it noted here before that they only go in one way and tight?... Not really any play what so ever......
mr. fix it
Old Man with a Hat
Wasnt it noted here before that they only go in one way and tight?... Not really any play what so ever......
There is shims under the front mount.
Always a bit of wiggling to do..
MrMoparCHP
Old Man with a Hat
Yes, the rear of the stub frame is located by one bolt in the rear (one of the ones accessed through the floor), all the other rear bolts go in and that sets the rear of the frame and forward axis alignment. The only adjustment is at the front with the use of shims. If needed shims can also be added under the core support to help bring the front of the fenders up if needed.Wasnt it noted here before that they only go in one way and tight?... Not really any play what so ever......
Alan
polara71
Old Man with a Hat
Thats it...... Thanks Alan....
mr. fix it
Old Man with a Hat
Yes, the rear of the stub frame is located by one bolt in the rear (one of the ones accessed through the floor), all the other rear bolts go in and that sets the rear of the frame and forward axis alignment. The only adjustment is at the front with the use of shims. If needed shims can also be added under the core support to help bring the front of the fenders up if needed.
Alan
I would normally agree but I replaced the side rail frame mounts so I'm being a little anal about the alignment.
The 1/4" isnt a big deal but I want to be sure.
Thanks!
commando1
Old Man with a Hat
I truly understand and don't blame you.Yes, the rear of the stub frame is located by one bolt in the rear (one of the ones accessed through the floor), all the other rear bolts go in and that sets the rear of the frame and forward axis alignment. The only adjustment is at the front with the use of shims. If needed shims can also be added under the core support to help bring the front of the fenders up if needed.
Alan
I would normally agree but I replaced the side rail frame mounts so I'm being a little anal about the alignment.
The 1/4" isnt a big deal but I want to be sure.
Thanks!
Posted via Topify on Android
MrMoparCHP
Old Man with a Hat
I don't have my service manual with me at work but I do know there is a frame drawing with measurements, I'm assuming there is another one with the full body and frame. It might be tricky with a tape measure, the frame shops have rods to measure with. A couple diagonals should conferm it. Those frame brackets should have little to no play in how they attach assuming you left the bolting plates alone.
Check the book.
Alan
Check the book.
Alan
greasemonkeyman
Well-Known Member
I would guess that if all the bolt holes line up then it would be fairly straight.As long as your using the same shim that came from each side then putting them back in the same location should be good.Most of your alignment should be done with the front suspension anyways.I know I've got two shim plates on each side of the subframe below the cowl and they will only go on in one direction due to locating pins in the plates.Back in the day,I don't think there was too much worry about fit,finish,and alignment of things,so whatever you do will probably be an improvement on what the factory did.
mr. fix it
Old Man with a Hat
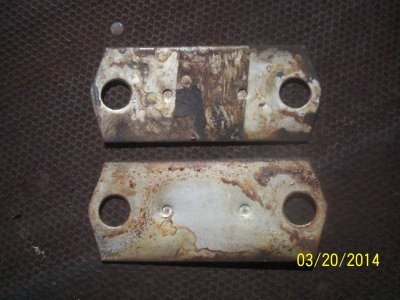
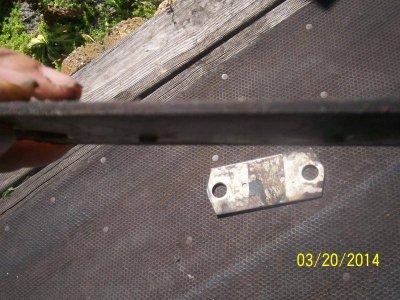
I had to replace the shim plates as well due to extreme rust expansion as seen here.
I had a local laser metal cutting shop make me replacements for $20 which was a fantastic bargain in my opnion.
I didn't realize there was aligning notches but it shouldn't matter.
The notches shouldn't affect the alignment as long as I keep them together as I tighten things up.
My main concern for the shims is that the replacements are much less rusty than the originals as you will see in the photos here!:yaayy::yaayy:
I will line it a best as possible and go forward from that.
Thanks for the input everyone.
greasemonkeyman
Well-Known Member
Those original shim plates look bent up in the center. Did they come out that way? Is there a specific thickness to these plates or were different sizes used depending on the vehicle?
mr. fix it
Old Man with a Hat
Those original shim plates look bent up in the center. Did they come out that way? Is there a specific thickness to these plates or were different sizes used depending on the vehicle?
The shims were so bloated from rust that it pushed the body mounts and stub frame contacts out of shape as well.
I'll post photos later to show how bad it was..
I'm not sure about different thickness shims but have been tol5that it's a get it as close as possible technology.
greasemonkeyman
Well-Known Member
mr. fix it
Old Man with a Hat
............The shims were so bloated from rust that it pushed the body mounts and stub frame contacts out of shape as well.
I'll post photos later to show how bad it was..
I'm not sure about different thickness shims but have been told that it's a get it as close as possible technology.
I can add the dimples I think. .
Thanks for posting the shots of your parts
mr. fix it
Old Man with a Hat
Here's a few more parts painted and ready to install once the engine arrives.
I planted the steering box back into place.
I realize I still need to paint the knuckle on the steering box..
I used a cast metal high heat paint for the clean cast iron appearance.


I planted the steering box back into place.
I realize I still need to paint the knuckle on the steering box..
I used a cast metal high heat paint for the clean cast iron appearance.
Similar threads
- Replies
- 51
- Views
- 8K
- Replies
- 11
- Views
- 3K


