What did you do to your C-body today....

The inner fenders are looking good. Keep at it and before you know it, you'll have it all back together.
Are you planning to spray any undercoating on the inner fenders in the wheel wells?
It will help keep the sound of rocks bouncing off the road and hitting the inner fenders to a minimum. (Probably why MaMopar did this on the assembly line).
I will yes. I was gonna have them sprayed with bed liner material, same guys that did my truck bed, but decided to undercoat as you mentioned..waiting for the other one to come back…
 
After two years of intermittent reverse lights I finally replaced the backup light switch in the’68 Polara.
I have good ground and wiring because if you connect the two wires under the column they would light up. If I manually moved the switch (very slowly) they would light up and and an ohmmeter would show continuity. However it was a very small window that would make it work. I am pretty sure the contacts are worn to nubs. Any way plugged in the NOS switch, and found it had a larger zone to keep the lights on than my worn out switch. Set it per the service manual using A 3/32” pin (aka drill bit) and now it works perfectly.
BBF8DD2F-9CA2-4711-A855-000A14448F25.jpeg
01FBF6A3-F46D-4F7B-A98D-B51BD5726450.jpeg
 
Been doing a little driveway rattle can restoration, I sent both of my upper control arms and inner fender wells out to be powder coated, passenger side fender well came back along with both control arms, just waiting on the driver side, had new upper control arm bushings, ball joints and bump stops installed.. decided to clean up the frame rails and everything I had access to for a little paint and undercoat. Once everything is back in place I’ll install the inner fender Splash guards I got while back from Javier awhile back, then on to the Rear Springs and Axel resto.

C1001052-C8FE-44FD-965F-8B05EA8F354F.jpeg


BD2A639E-32AE-4050-8D84-69C8506D756E.jpeg


DF55EC1C-A95A-47B6-B44C-740F0615D5B5.jpeg


6B7E7583-2034-4FE0-80F4-93357C214183.jpeg


42629B0C-D94C-4867-84B5-07F5F068183B.jpeg


A7FFA21A-BF90-4F1E-917D-7A1CEC7AB88F.jpeg


C4AD596B-3BCD-4FB8-BD2F-56DCC243DE8F.jpeg


A01C2DC5-3687-4901-9A08-E0A04324C916.jpeg
 
Last edited:
Found out what the clunking in the back of the Polara is, the shock cross member came loose on the driver's side. I was under the passenger side and noticed the shock wiggle as I was checking the sending unit. No further inspection, I'll look at it closer after the weekend.
 
@BLIMP and I replaced the brake booster in the Chrysler wagon....
Finally got it back from Booster Mark in Washington....
Wasn't able to see how it works as still waiting on a carb.........


1650921644410.png


.
 
Last edited:
Finished up the passenger side today, installed upper control arms, having under coded everything, ready for the wheel, I’ll finish up reinstalling the driver side wheel well and control arm this weekend. Then she’ll be back on all fours. Lol

A5FD02C2-EACF-4C41-BD95-27077C792FB3.jpeg


2B507164-E75E-4669-AC61-47D19DAFCA8A.jpeg


71E71B0C-8264-4C25-9CE1-7C705AAC39A4.jpeg


E9E18E99-6CE6-472B-9FF9-E6F8CED2B756.jpeg
 
We’ll she’s back on all 4’S.. finished up installing the driver side inner fender well and upper control arm yesterday and scuffed everything up for a good layer of undercoat. On the next project. The rattle can restoration continuous.

062DE0FE-7B54-4452-8EF0-599B68B150FC.jpeg


D6C6B899-350C-4BCF-9EEE-04A64C519AF6.jpeg


4A138D3F-F6E0-4044-87CE-6985F6C0D1A7.jpeg


3C96F5E8-5DE1-46FF-B2E4-5A0F15E41F9F.jpeg


38A55A4E-CF07-4CC7-BC64-1B8B195B787F.jpeg


D38FBA9F-A6A5-42C5-9527-C94F0499BC95.jpeg


E7CD39C7-7289-4D24-A41D-BFC74BDB1D28.jpeg


9B55A380-3B67-4202-8A42-510F01241FC7.jpeg


7BAD5955-6C56-4FF3-8A31-A2AF74CA3BD0.jpeg
 
@75LandYacht did you have to remove the upper control arms to remove the inner fenders or could it be done with those still in place?
Thanks for the question, when I pulled the passenger side off, I did it without the control arm being removed. However putting it back in after it’s been painted or powder coated without the control arm in the way was much easier, since I was having the control arms Powder Coated I pulled both sides anyways. You’ll find it’s easier with the upper control arms removed, you’ve more room to maneuver the inner fender so you don’t scratch it. You WILL need to disconnect the upper ball joint letting the lower hang though for maneuverability.

Timeline: about an 1hr 1/2 or so.. of course the car will need to be in the air or on jackstands, you’ll have to disconnect everything mounted on top of the inner fender well, you’ll also have to remove the parking / cornering light, disconnect the ball joint from the spindle and undo all the bolts securing the inner fender. once everything was out of the way, removing the inner fender well only took about 15 to 20 minutes.
 
Last edited:
Was 300$ for the rebuild and replacing the collar on the backside and shipping back...
There is pricing listed on the webpage..
Power Brake Booster Exchange - Parts for Classic Cars

Turn around time was rather long..
BUT.....
Considering Mark just took this operation over and everything had to be moved
from Oregon to Washington and all the while people are sending in boosters to be done...
Normally it is around two or three weeks...


.
 
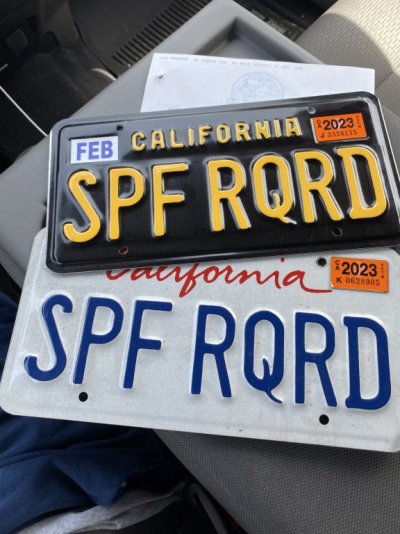
Took a lot longer than expected, but I finally got my 1960s vintage plates in. These make my car feel even more legit!
6868E485-D10F-4906-956A-54C002FCF053.jpeg

E5B0CA1D-1E52-4E1C-8C54-1EAE0D37189B.jpeg


D38C9433-3406-463C-8441-7EAE00A4FF32.jpeg
 
Also finally got my back seat redone. Learned a valuable lesson during this process. If you are going to do your fronts seats at a different time than your back seats, buy ALL the material you need to do both at the same time. It has been quite an adventure trying to source the material three years later. Still looking for a bit more to have the top cover redone.

ED4B2CCD-B14E-40B3-BAAD-56F3635A76DD.jpeg


699A2F98-0FD0-4962-8785-738DE7315610.jpeg
 
Last edited:
Well after 3 years of search was able to find the correct Bendix booster to complete the front disc changeover on the wagon .I sent it to Booster Dewey for a rebuild and had it installed yesterday along with our annual Pa state safety inspection.The pedal goes a little further than before I just got to drive it to get used to it

IMG_20220505_160857830_HDR.jpg


IMG_20220505_160822495_HDR.jpg


IMG_20220505_160812946_HDR.jpg


IMG_20220505_160848527_HDR.jpg
 
Back
Top