1966 Polara 880: The Build So Far, or "Bring Money".

Started a project a few evenings this week: piping in some tunes.

I approached this upgrade on a budget. A Retrosound system would be ideal, but I feel the cost for one of those systems is not ideal for my needs. It all started with a pair of 3.5" speakers I've had kicking around for the past 20 years or so that were too small for everything else I've owned over the years.

With that, I bought the cheapest Bluetooth radio I could find and went about making a new glovebox insert to mount the radio.

20220812_194848.jpg

20220813_184641.jpg


I thought about painting the inside with a hammertone paint, but decided it would be best if the inside were upholstered. Here are the results:

20220813_211454.jpg
20220813_211510.jpg


I'm happy with how it turned out, and it looks a lot better than the old decaying liner.
 
I decided the old speakers had to go. One would crackle every now and again, and that just won't do. To rectify that, I did the right thing and bought the best $40 speakers that had 1 day shipping Amazon had available.

Pictured below are photos of the speaker plate that I didn't include in the last post, as well as the new ones.

20220815_185104.jpg

20220815_185220.jpg

Lanzar VX320: When *Quality* Matters.

20220815_185744.jpg


The sound quality is actually not terrible. Good, in fact. 80 watts peak each, the old Pioneers were only 40. Hopefully they last. If not, I won't be heart broken. I have less than $100 into this stereo setup.
 
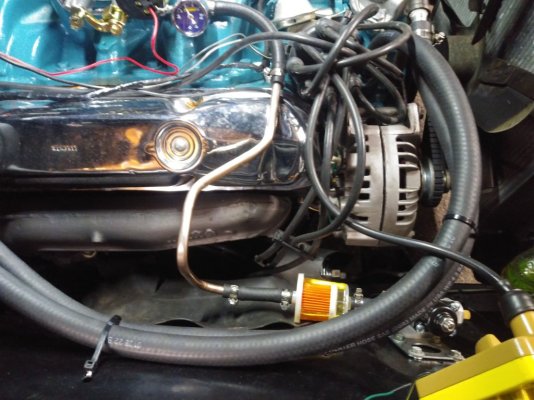
Wow, has it really been 8 months since the last update? Well, yeah. Not much has happened, really. The only notable updates are the additions of a new AVS2 800 cfm carburetor, a pressure regulator, and I also rerouted the fuel lines to keep them farther away from the engine.

20230425_154908.jpg


20230425_154921.jpg

20230425_154932.jpg


Also, took the time to add a bumper sticker. I'm generally not a fan of them, but on this car, it seems right.

20230425_155013.jpg


The only political endorsement I'll ever make. :lol:
 
Last edited:
Here's the latest:

20230523_152631.jpg


20230523_152605.jpg


20230523_152739.jpg


It's just about where I like it. There's a few things left I'd like to do, such as gears & a posi, an electric fan, and maybe a shift kit.
 
This update has been a long time coming. Honestly, I haven't done anything to the car since my last post other than drive it and enjoy it for the past year and a half. I've put thousands of trouble-free miles on the odometer, but now it's time to do something about the stub frame.

It's been repaired in the past, and has been showing signs of corrosion around the torsion bar mounts since I bought it. I purchased a mint stub frame this summer, so now the tear-down begins.

PXL_20241223_213514934.MP.jpg


PXL_20241223_213557299.jpg


PXL_20241223_232719836.jpg


I was somewhat dreading what I would find underneath, being a southern Ontario car, but the only surprise to greet me was solid, original steel. The inner fenders were the only signs of past butchery, as they were welded and seam-sealed together. Other than minor rot inside the driver's fender, and a bit of bubbling on the bottom of the passenger side fender, they are perfectly fine.
 
Last edited:
PXL_20250210_221226103.jpg


Here's where I'm at, currently. Engine and trans is out, everything else underneath is unhooked, save for the frame itself. What I'm wondering is should I remove the torsion bars now, or after the frame is out? Your input, as normal, is appreciated.
 
View attachment 705842

Here's where I'm at, currently. Engine and trans is out, everything else underneath is unhooked, save for the frame itself. What I'm wondering is should I remove the torsion bars now, or after the frame is out? Your input, as normal, is appreciated.
Take the tension off the torsion bars if not done already.
I prefer pulling the bars after the stub is removed but othets may prefer before hand.
 
You're swapping this stub out - yes? So you're going to have to support the body. When I started I jacked my '67 Monaco front up and set blocks under the front rocker rails in front of the doors and a block under the engine cross-member and rested the car on those. I did not use cribbing. I eventually rolled out the stub with engine and trans still mounted, but I backed off the torsion tension quite a bit before I did that because the wheels weren't supporting the car any more, just the engine.

You really can't do anything with the torsion bars while the full weight of the car is still on the tires. So you've got to block-up the body, put a block under engine cross member and get rid of the cribbing. Then you can dial back the tension on the torsion bars pretty much all the way. If the wheels are in the air, put something under them, planks or what-ever. I used cinder blocks under the body and engine cross member, but never in direct contact with the car or the ground (always used a thin piece of plywood). The blocks can crack easily unless protected by some wood. When you support the body, you have to do it in a way that does not get in the way of when you drop and pull the stub forward.

Before you do anything, fully disconnect the steering shaft. You'll have to drop the column and move if forward, it has to come off the steering gear.


369.jpg
 
You're swapping this stub out - yes? So you're going to have to support the body. When I started I jacked my '67 Monaco front up and set blocks under the front rocker rails in front of the doors and a block under the engine cross-member and rested the car on those. I did not use cribbing. I eventually rolled out the stub with engine and trans still mounted, but I backed off the torsion tension quite a bit before I did that because the wheels weren't supporting the car any more, just the engine.

You really can't do anything with the torsion bars while the full weight of the car is still on the tires. So you've got to block-up the body, put a block under engine cross member and get rid of the cribbing. Then you can dial back the tension on the torsion bars pretty much all the way. If the wheels are in the air, put something under them, planks or what-ever. I used cinder blocks under the body and engine cross member, but never in direct contact with the car or the ground (always used a thin piece of plywood). The blocks can crack easily unless protected by some wood. When you support the body, you have to do it in a way that does not get in the way of when you drop and pull the stub forward.

Before you do anything, fully disconnect the steering shaft. You'll have to drop the column and move if forward, it has to come off the steering gear.


View attachment 705847
Thanks for the advice. It lines up with the plans I had, so thanks for confirming I'm on the right track. And yes, I am swapping stubs. In fact, the stub that's going in used to belong to you.
 
Yea, I remember, good to see you working on it! Here's how I put blocks under the car, right under where the door is. I later put another set behind these. Those notched pieces are what I had, not ideal.

341.jpg
 
PXL_20250220_215602848.jpg


Nobody said this was going to be easy...

It would appear as though rust has fused the frame and the body together on the driver's side. Those rear bolts aren't going to budge easily. I'm thinking I may need to remove the torsion bars and cut that part of the frame apart from the body. Should be fun.
 
Last edited:
Nobody said this was going to be easy...

It would appear as though rust has fused the frame and the body together on the driver's side. Those rear bolts aren't going to budge easily. I'm thinking I may need to remove the torsion bars and cut that part of the frame apart from the body. Should be fun.

No, don't do that. The bolt you're showing is one of 8 bolts (no, actually 10) that connect the transmission crossmember to the stub. No need to wrestle with those while the stub is still under the car. And - your cross member may not be usable anyways. I was able to re-use mine, but it did show a lot of rust erosion on the inside, and I cut the lower panel off of it and welded a new 3/16 plate.

When working the actual bolts that connect the stub to the body, where I could reach them I used a small wire cup on the heads first to clean the rust scale off them. Some of those bolts you can see the end of the bolt and have access with a cut-off wheel to cut the end of the bolt off if it's really badly rusted. Spray actual real penetrating oil at the bolts, and work them back and forth (I did all that by hand, no air or power tools). Working a rusted bolt back and forth (and using the oil spray) means you have less chance to break it. Also, some metric socket sizes might be a better fit because of rust erosion of the heads. Always use 6-point sockets (not 12).

This portion is fortunately not the transmission cross member. The cross member is in decent shape. This is the portion next to the rocker panel. I have been soaking them for awhile, to no avail. I will likely cut the heads off the bolts, after further reflection.
 
Great job. when you get a spare moment, take some black electrical tape and tape all your wires at the bulk head to look professional, looks like blind lady trying to knit.
 
Great job. when you get a spare moment, take some black electrical tape and tape all your wires at the bulk head to look professional, looks like blind lady trying to knit.

Blind lady. I like that. I'm definitely rerouting the wires when everything goes back together. I prioritized enjoying the car before and only cared that it was running and driving. The spaghetti factory has been eating away at me.
 
This portion is fortunately not the transmission cross member. The cross member is in decent shape. This is the portion next to the rocker panel. I have been soaking them for awhile, to no avail. I will likely cut the heads off the bolts, after further reflection.

Ah ok. The nut behind that bolt is welded inside the stub. It's one of 3 bolts on each side that need to come off. One of which you access from inside the car on the floor, under a plug. The third bolt I had to go to Princess Auto and buy the ratchet extension set (3 extension bars, I think $17, between 2 and 3 ft long) to get to that bolt.
 
Ah ok. The nut behind that bolt is welded inside the stub. It's one of 3 bolts on each side that need to come off. One of which you access from inside the car on the floor, under a plug. The third bolt I had to go to Princess Auto and buy the ratchet extension set (3 extension bars, I think $17, between 2 and 3 ft long) to get to that bolt.

Did you have to remove the seat to get to those top 2 bolts?
 
Back
Top